Zwave-JS-UI
Also known under previous name ZWaveJS2MQTT

See https://zwave-js.github.io/zwave-js-ui/#/README
Fully configurable Z-Wave to MQTT Gateway and Control Panel. Domoticz can communicate with Zwave-JS-UI over MQTT with Auto Discover enabled. So it is not integrated in Domoticz like previous OpenZwave.
Main features
- Full-Featured Z-Wave to MQTT Gateway: Expose Z-Wave devices to an MQTT broker in a fully configurable manner
- Secured: Supports HTTPS and user authentication
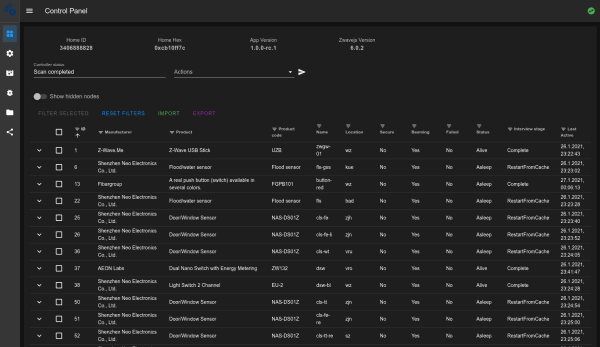
- Control Panel UI: Directly control your nodes and their values from the UI, including:
- Nodes management: Add, remove, and configure all nodes in your Z-Wave network
- Firmware updates: Update device firmware using manufacturer-supplied firmware files
- Groups associations: Add, edit, and remove direct node associations
- Z-Wave JS Exposed: Provides full-access to Z-Wave JS's APIs
- Scene Management: Create scenes and trigger them by using MQTT APIs (with timeout support)
- Debug Logs in the UI: See debug logs directly from the UI
- Access Store Files in the UI: Access the files are stored in the persistent
storefolder directly from the UI - Network Graph: Provides a beautiful map showing how nodes are communicating with the controller
- Supports HA Discovery via MQTT
Prerequisites
Installing docker compose
If you do not have docker compose already installed, follow the below steps to do so
sudo apt-get update && sudo apt-get upgrade
sudo apt-get install -y make git
curl -fsSL test.docker.com -o get-docker.sh && sh get-docker.sh
sudo usermod -aG docker ${USER}
sudo systemctl enable docker
sudo reboot
Docker compose hardly does take any system resources and is a great way to install packages/services.
This is because it runs in its separate system and can use certain system resources (like hdd, serial ports)
I advise to install all docker compose containers in their own folder (I do this in the /opt folder, like /opt/domoticz)
You want your settings/data folders on your local system, so you can map local folders/files to the docker container.
This is called 'volumes'. You can make volumes/links globally, but I advise to keep all folders/files in the docker folder itself.
This way it is easy to make backups, you just copy the folder.
A quick tutorial, you start a docker compose container with
docker compose up -d
(The -d means, run in the background). To stop a docker compose you issue
docker compose down
If you want to see what's going on you start the docker compose container without the -d flag, when done, press control-c to stop (the docker compose container is stopped)
MQTT Broker
ZWaveJS-UI (like Zigbee2MQTT) communicates via MQTT with Domoticz. (ZWaveJS-UI <---> MQTT <---> Domoticz)
So, for this to work you need to have a MQTT broker up and running. And this is the hardest part in this setup process.
sudo su -
git clone https://github.com/vvatelot/mosquitto-docker-compose /opt/mosquitto
cd /opt/mosquitto
make setup-project
docker compose up -d
For more information have a look on this page
There is one additional step we need to be doing, we want the MQTT broker to restart when the system starts.
For this you have to edit the file docker-compose.yaml in /opt/mosquitto and add the following line underneath 'mosquitto:'
restart: unless-stopped
Make sure it aligns with spaces at the same start as the line below (build:) so it looks like:
services:
  mosquitto:
    restart: unless-stopped
    build:
      context: .
Next restart the docker compose container with
docker compose down
docker compose up -d
MQTT should now be available on port 1883. You can also use an application like 'MQTT Explorer' to connect to your new broker
You should enter the machine's IP address (like 192.168.2.3), not localhost and not 127.0.0.1!
See also Wiki page MQTT#Add_hardware MQTT_Auto_Discovery_Client_Gateway
Serial Port
ZWave works via a USB dongle connected to your system. We need to identify this serial device first.
We do this by issuing the following command
ls /dev/serial/by-id
You should see one or multiple serial devices, find out which one is your ZWave stick, for example it's: usb-Silicon_Labs_CP2102_USB_to_UART_Bridge_Controller_0001-if00-port0
We need to map this serial port to the ZWaveJS docker container in the next step.
Installing ZWaveJS-UI
When you have your MQTT broker setup, added the MQTT Auto discovery to Domoticz, it's time to install ZWaveJS-UI itself
sudo su -
mkdir /opt/zwavejs-ui
cd /opt/zwavejs-ui
Now you need to create the docker-compose.yml configuration file in /opt/zwavejs-ui with the following contents:
Original .yml file can be found here: link
version: '3.7'
services:
    zwave-js-ui:
        container_name: zwave-js-ui
        image: zwavejs/zwave-js-ui:latest
        restart: always
        tty: true
        stop_signal: SIGINT
        environment:
            - SESSION_SECRET=mysupersecretkey
            - ZWAVEJS_EXTERNAL_CONFIG=/usr/src/app/store/.config-db
            # Change if you want log times and dates to match your timezone
            # Available at https://en.wikipedia.org/wiki/List_of_tz_database_time_zones
            - TZ=Europe/Amsterdam
        networks:
            - zwave
        devices:
            # Do not use /dev/ttyUSBX serial devices, as those mappings can change over time.
            # Instead, use the /dev/serial/by-id/X serial device for your Z-Wave stick.
            - '/dev/serial/by-id/insert_stick_reference_here:/dev/zwave'
        volumes:
            - zwave-config:/usr/src/app/store
        # Or by using local folder
        # - ./store:/usr/src/app/store
        ports:
            - '8091:8091' # port for web interface
            - '3000:3000' # port for Z-Wave JS websocket server
networks:
    zwave:
volumes:
    zwave-config:
        name: zwave-config
It is important to note that you need to replace the serial port part with the correct serial device you found before. (keep the /dev/serial/by-id/ in front)
Now you can launch the docker compose container with 'docker compose up -d' or you can launch it without -d to see what's going on.
docker compose up -d
You should now be able to point your browser to port 8091 eg http://IPAddress:8091/of the machine where this docker is installed. It could take a few seconds to launch.
Configure Zwave-JS-UI for Domoticz
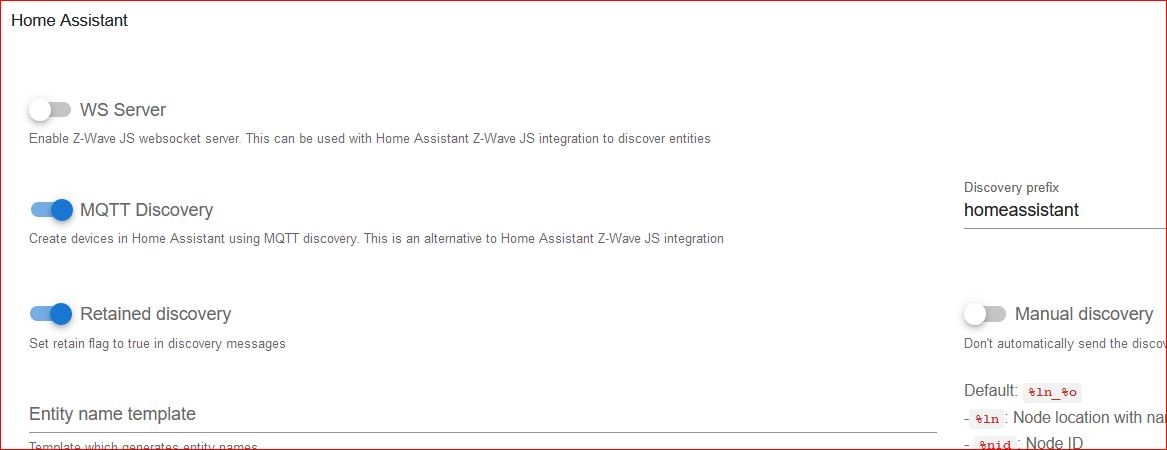
Next you need to configure ZWaveJS-UI, set the MQTT broker parameters and enable the MQTT Discovery option
- Menu Settings, section MQTT: best to switch ON the
retainflag for having Domoticz rediscover devices after a reboot.- Note: Switching
RetainON give issues when deleting devices from Zwave-JS-UI as they keep reappearing in Domoticz until you manually delete the messages from the broker. See MQTT wiki for instructions to remove retained messages
- Note: Switching
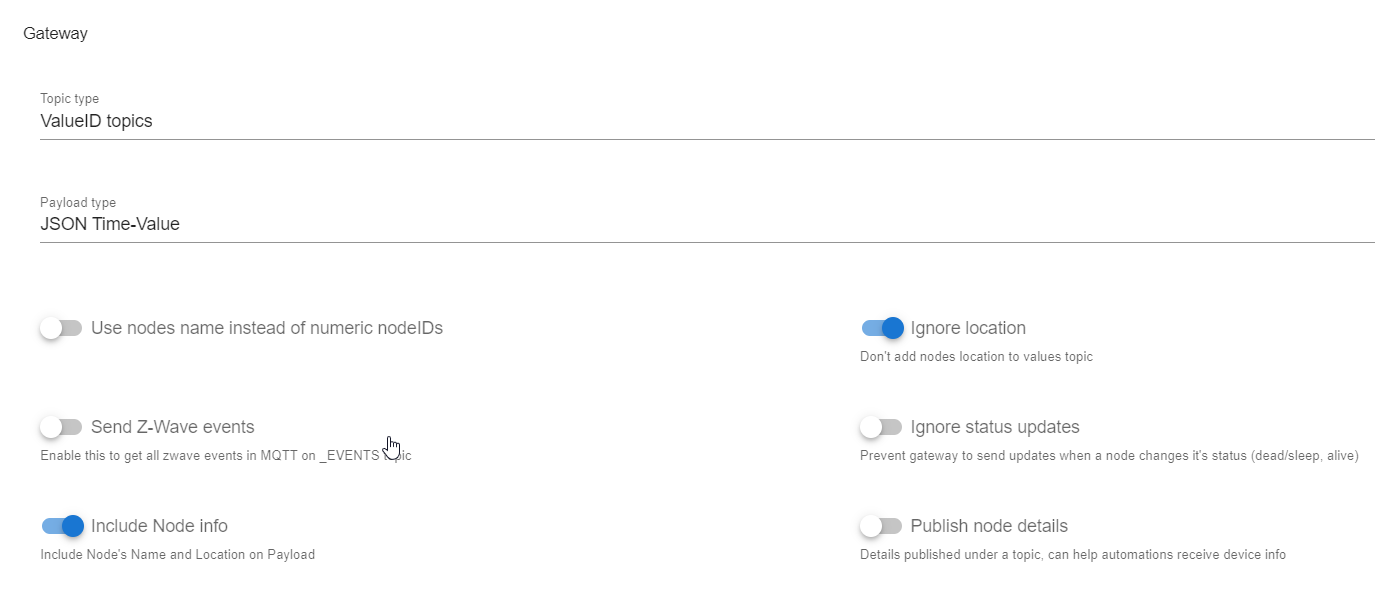
- Advised Gateway configuration (Menu Settings, section Gateway):
- Use node names instead of numeric nodeIDs: Off. (perhaps On is better, see next note)
- Note: With Node names:On you can first rename the NodeNames in Zwave-JS-UI to something meaningfull and then switch on MQTT Discovery. In Domoticz you will get meaningfull Device Names created.
- Ignore location: On
- Include Node Info: On
- Use node names instead of numeric nodeIDs: Off. (perhaps On is better, see next note)
- Activate
MQTT Discoveryswitch in ZwaveJSUI in section Home Assistant.- If multiple HA Autodiscover gateways are active (like Zigbee2MQTT) you could change the Discovery Prefix (default homeassistant) to something else (eg zwavejsAD) and use this in the previous step in the Domoticz MQTT Auto Discovery hardware as client gateway definition. But do NOT make Discovery Prefix the same as the main zwave topic (default zwave) as Domoticz will not be able to read the topics!!
Install MQTT Auto Discover Client gateway
Add Domoticz MQTT Auto Discover Client gateway (menu Setup - Hardware), see also wiki page MQTT
- To use it add the build in hardware "MQTT Auto Discover Client Gateway with LAN interface"
- Enter the MQTT broker details IP address (do not use localhost or 127.0.0.1) and port (eg 1883)
- Set Auto Discovery topic field, (default = homeassistant) or as set in HomeAssistant_discovery_topic in Zwave-JS-UI settings earlier.
- Click on Add to add the MQTT Client Gateway configured to Zwave-JS-UI.
After adding/updating the MQTT Client Gateway for Zwave-JS-UI the Zwave devices will be automatically added in the Domoticz device list if discovered by Zwave-JS-UI, check menu Setup - Devices. Domoticz devices will be created once data is received. So especially for battery operated devices it can take some time to have this data received. Sometimes it is possible to activate these sensors manually by pushing a button.
Hint: To add all devices at once, press "Save" in Zwave-JS-UI preferences. This will generate status messages for all devices. Or restart Zwave-JS-UI.
Note: In contrary to the old OpenZwave integration the devices/switches will not be shown in the Setup button of the MQTT Hardware Gateway but in the main Domoticz device list ( menu Setup -Devices)! Zwave Nodes etc will be managed from Zwave-JS-UI user interface on port 8091, not in Domoticz.
Note: After creation of the MQTT Autodiscover hardware in menu Setup - Hardware you can click on the setup button to configure the discovered configuration devices if they have that option using Autodiscovery Number devices. It could well be that this list is completely empty! It is used for setting preference of devices, eg detection distance, Connection interval, LED brightness etc.
Supported Devices
See the below link for supported devices: 
Migrating from OpenZwave
Note: The Zwave devices pairings are stored on the Zwave USB stick so no need to re-pair the devices.
- Backup Z-Wave data from Domoticz. Most imporant data is:
- Security Network Key. It is set in the Menu Setup - Hardware, click on the Setup on the OpenZwave Hardware item. Then you click on the ZWAVE Controller device and scroll down to the details where you will find "4. Security Network Key:" defined.
- List of NodeID's and node names.
- The USB address of your Z-Wave usb stick.
- Disable (not delete!) OpenZwave gateway in Domoticz (menu Setup - hardware)
- Install Zwave JS UI (see above) and configure the MQTT settings. Make sure using a real IP address and not localhost/127.0.0.1
- Install MQTT Auto Discover Client gateway in Domoticz as instructed above.
- New devices are created in Domoticz by MQTT AutoDiscover and visible in menu Setup- Devices (not in Setup - Hardware - MQTT AD gateway - Setup like in OZW integration!!!)
- If you want to keep the history logging of the old devices then you need to replace the old device with the new one if identical devices are created. Use the replace function in Edit device, see wiki Replace Devices Devices that were replaced will get the old name and old IDX, no need to change scripts.
- NOTE: To see the devices of the disabled OpenZwave hardware gateway during replacement action go to menu Setup - Settings and disable setting "Hide disabled hardware devices". Enable it again when you are done.
- NOTE: Alternatively, you can also change the type of the old disabled OpenZwave hardware to "Dummy" and re-enable it, then replace each dummy device with equivalent Zwave JS UI discovered device.
- Now you can delete the old OpenZwave gateway in Domoticz (menu Setup - hardware). All related old devices that not were replaced in step 6 will be deleted.
- Also good to completely reboot to test total system startup (including zwave-js-ui service or docker container).
Ignore discovery of Zwave node devices
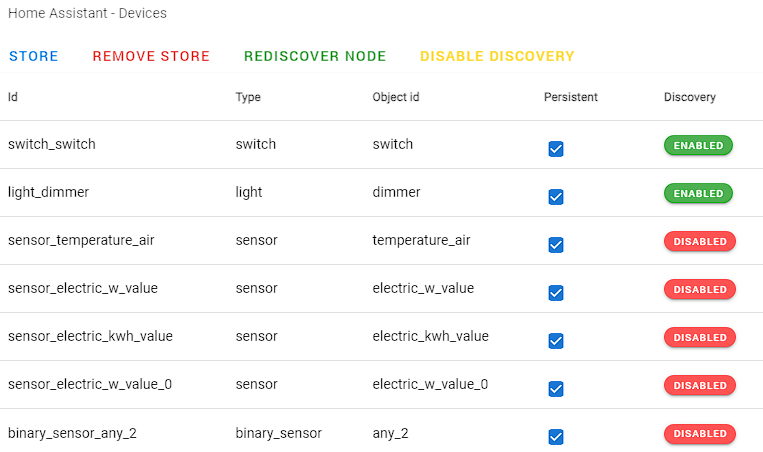
Some Zwave nodes are creating a lot of Domoticz devices.To prevent them to be created in Domoticz you can disable the Discovery in Zwave-JS-UI as shown below in the Zwave-JS-UI screenshot.
If the devices are already discovered once before, you have to delete the old retained MQTT config topics and restart Domoticz. Else the devices are recreated again....
Optional you can add the frontend User interface of Zwave-JS-UI as a custom menu in Domoticz.
Make a file Zwave-JS-UI.html in domoticz/www/templates
Contents
<IFRAME SRC="http://IPAddress:8091/" height="800" width="100%"></IFRAME>
Rename IPAddress to the real IP address of your domoticz server. Also change the port of the frontend if changed in setup.
Restart Domoticz and you will have another Zwave-JS-UI entry in custom menu.
See also wiki page Custom Menu
Debug MQTT
For General MQTT message debugging see wiki page MQTT and if debugging data is requested by Domoticz developers check page MQTT AD Report Problems
For Zwave JS UI (formerly ZwaveJS2MQTT) specific check the Zwave JS UI Troubleshooting pages
For discussing functionality of Zwave-JS-UI (Zwave nodes errors, Zwave connection issues etc) use the Zwave-JS-UI forum https://github.com/zwave-js/zwave-js-ui/discussions


