Managing Devices
Introduction
Devices are created when the Hardware gateway (Setup - Hardware) to were the devices are connected to is added to Domoticz.
Devices can be managed in the Devices list (menu Setup - Devices) or in the overview screens Switches, Scenes, Temperature, Weather and Utility. It depends on the type of device where they are placed.
For each type of device there is a tab in the top bar navigation. The tabs can be switched on/off in the menu Setup - Settings. It is not possible to move devices from one tab to the other.
Basic steps to add devices:
- Go to Setup - Settings to set your location (important for day/night timing).
- Go to Setup - Hardware and add an hardware gateway. Follow the instructions for that particular hardware gateway.
- Go to Setup - Devices to enable (if disabled) the devices created by the hardware gateway
Device Widgets
Each hardware device can be represented by one (ore more) device widgets. For example a smart thermostat can have a Temp Setpoint widget, a Set Mode widget, a Temp Sensor widget etc
As they have different functions they could show up in different Device Tabs (Switches, Temperature, Weather, Utility) in Domoticz.
If the device is battery controlled and the battery level is low, the highlight color will be Yellow (see also wiki page for settings)
If the devices is not seen for a long time (timed out) the highlight color will be Red. (See also wiki page for settings)
Some basic actions you can do with device widgets:
- Adding some devices as your 'favorites' by clicking on the yellow star on the device Widget. These devices will show up on your dashboard, to give you easy access.
- Setup notifications when for example sensors are going to a predefined level (eg temp < 0 degrees)
- Setup Timers to switch devices on or off in a time schedule (Timer Plan)
- Adding a floorplan. If you want you can create a floorplan, and place buttons on there for all your devices. You can even set this as your dashboard if you want.
- Show Device Log files or graphs per day/month/year. Generate yearly reports for further analysis
Switches
Switches are devices that can switch from one state to the other (on/off/level etc) and are displayed in widgets. The lights/switches tab includes devices like:
- Light Switches
- Door sensors
- Blinds (see special page for Blinds)
- Doorbells
- Security
- Sirens

Each item has the following options:
- Status icon that can be push to toggle on/off status (depending on the hardware)
- Favorite push icon (to display this device on the Dashboard tab)
- #Log (Displays the log)
- #Edit (Edit device parameters, and Sub/Slave Devices)
- #Timers (For setting up a schedule per device)
- #Notifications (see Notification chapter)
By Dragging/Dropping the sensor items, you can change the position of the devices in the window.
Lights and Switches can be added by:
- Auto Learning
- Manual Setup
- Activating them through the Setup - Devices page
Adding a RF Light/Switch by Auto Learning
Prerequisite: Have setting "Accept new hardware devices" enabled (enabled by default)
By pressing the ‘Learn Light/Switch’ button you have 5 seconds to press the remote/switch/sensor.
Note: Be sure you have no other Domoticz switches/Lights (eg Zwave, Zigbee, plugin controlled etc) are triggered during these 5 seconds. Else you get an error message that device is already known.
If this time is too short you should position yourself nearer the remote/switch/sensor by using a portable computer such as Tablet or Smartphone
Once you press the button the following screen is presented:
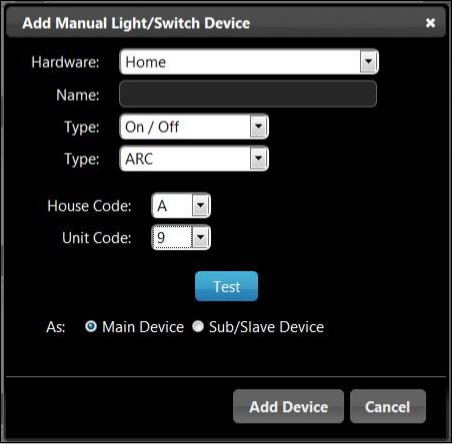
Adding a RF Light/Switch Manually
If you know the switch brand/type/address it is also possible to enter the parameters by hand.
It is also possible to create a new ‘virtual’ device that can control a light without having to buy a remote/switch.
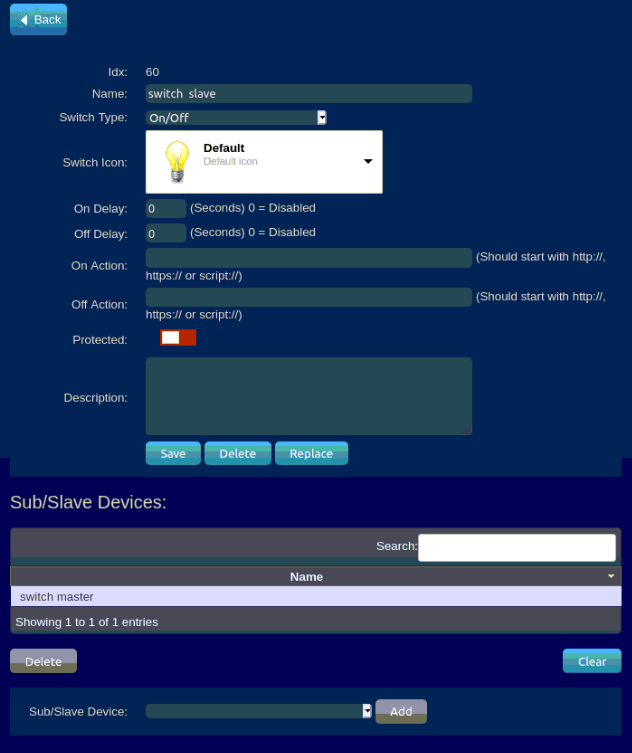
Sub/Slave devices
Used for RFLink/RfXCom devices to synchronise on/off statuses in Domoticz as these RF devices don't send status feedback.
Note: To use a switch to switch multiple lights on/off use the Domoticz Group (or scene) functionality.
To set a Master for a particular switch/light, click on the Edit button of the Sub/Slave device, Select the Master device from the pull down list and click on Add.
See below for more usage examples.
Most Lights can be controlled from up to 6 remotes.
See the following two examples:
Example 1 (Outdoor Light)
Imagine you have an outdoor light that is controlled by a switch (*a) from inside the house.
It is possible to buy small remote controllers (*b) for on a keychain.
When you also want to control the outside light from this small remote, the small remote (*b) is a Sub/Slave device from the main switch (*a).
Example 2 (Floor Lights)
Imagine you have a house with two floors, each floor has its own switch (*a, first floor) and (*b, second floor).
Downstairs next to your exit door you have a switch (*c) to turn ON / OFF ALL the lights. In this case the
switch (*c) is a Sub/Slave device for switch (*a, first floor) and (*b, second floor)
Consult your hardware manual on how to setup two/multiple switches for one light.
*Note: When adding a Sub/Slave device, this will not be visible in the ‘Lights’ tab by default. You see this device in the ‘Edit’ screen from the device you added it too.
If you also want to control or see the Sub/Slave device, you will have to add this device again, and set it up as Main device.
Scenes (also for Groups)
In the tab Scenes you can manually add Scenes and Groups to switch multiple devices in one time.
What is the difference between Scenes and Groups:
- A "Group" is a set you can turn on or off together. Like a big extension cord with a power switch. They all go on or off. But every device can switch on with different characteristics like dim level, color etc.
- A "Scene" is a predefined setup of lights and devices. So you can setup 1 light to be on, another to off. Have the ledstrip/milight set to a nice blue color, close your curtains, switch on your radio on station Xyz. That's also why you can't switch a scene off, but only to on. You will have to make an extra scene (or group) to switch the devices off.
So for example a group is used to turn all lights off when you leave the house.
And a scene is used when you have a nice setup of lightning you want when you are going to watch a movie.
States
- On: All related devices are On.
- Off: All related devices are Off.
- Mixed: Related devices have a mixed On/Off state
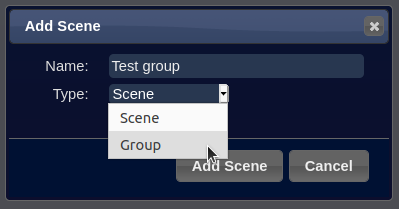
Add a Group/Scene
To Add a Group or Scene click on the Add Scene button, type a name and decide if you want to make a group or scene. Click on Add Scene to finally create it.
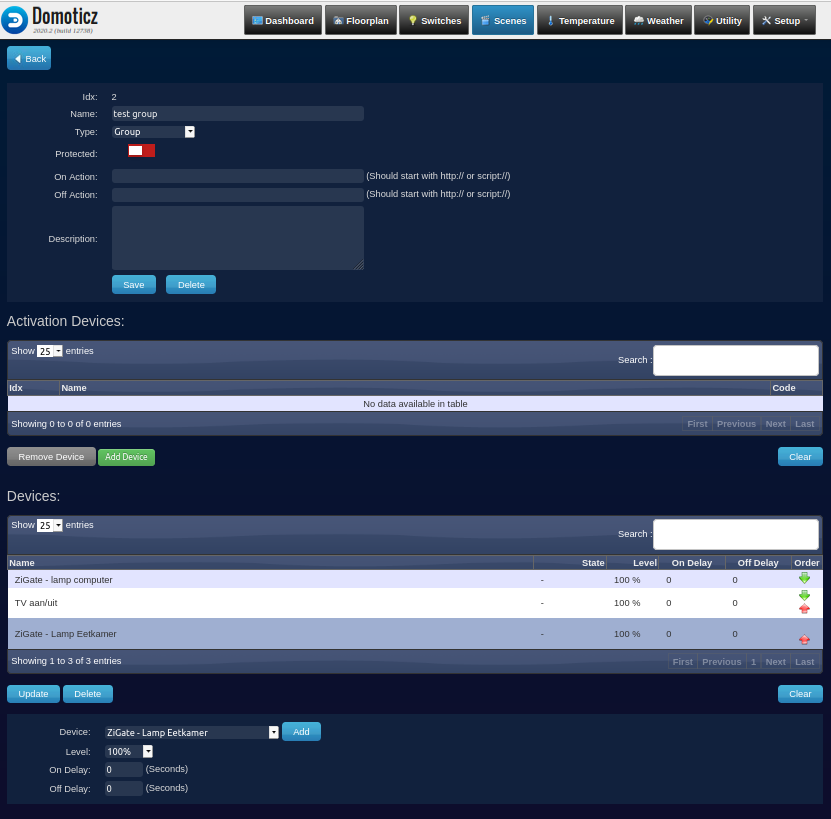
Edit Group Scene
Click on Edit button of the group scene to add devices to the group scene and change the characteristics (dim level, color, on/off/toggle etc) when switching on.
The Off delay on switch device in a Group/Scene causes a device to switch Off with a delay of the set amount of seconds after the switchOff command is given.
This differs from the Off delay on a normal switch
Click on the timer button to set timers for the Scene or group. See the general timer instruction.
Activation Device: You can use a Domoticz Switch to trigger the Group or Scene.
- Use the Add Device button to add a device by using it (eg remote or zigbee switch).
- Use the Add Manual Light/Switch Device button the select a switch/light from the list of Domoticz devices.
Devices: Add or remove devices that should be part of the Group or Scene. You can also set the state of the selected device.
Temperature
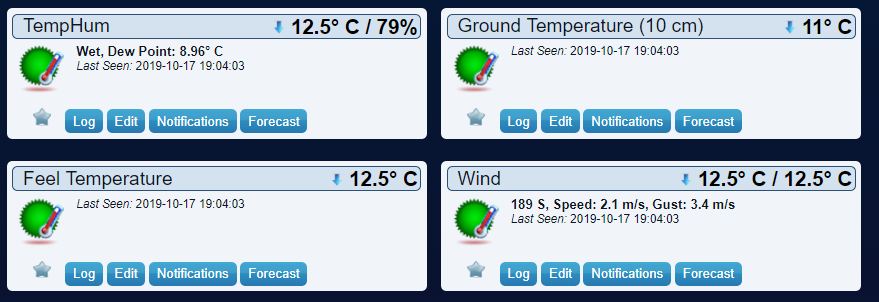
The temperature tab includes all sensors that have a temperature sensor.
A temperature sensor can also include a Humidity sensor.
Each item has the following options:
- Favorite push icon (to display this device on the Dashboard tab)
- #Log (Displays the Device log or Graph)
- #Edit (Edit device parameters)
- #Notifications (see Notification page)
By Dragging/Dropping the sensor items, you can change the position of the devices in the window.
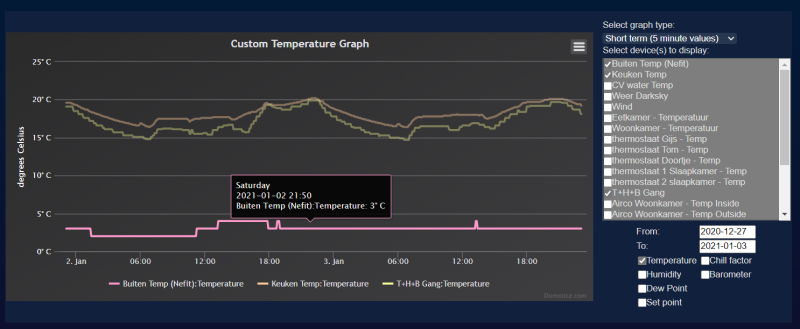
Custom Graph
Most devices have a Report button. In the Temperature tab the is a Custom Graph reporting button where you can set out various sensor values in one graph.
For example the inside and outside temperature of last week.
Weather
The weather tab includes all sensors that are related to weather
A weather sensor can be
- Rain Meter
- Wind Meter
- UV Meter
- Barometer
Each item has the following options:
- Favorite push icon (to display this device on the Dashboard tab)
- #Log (Displays the Device log or Graph)
- #Edit (Edit device parameters)
- #Notifications (see Notification page)
- Forecast (shows the weather forecast when Darksky weather forecast site is added)
By Dragging/Dropping the sensor items, you can change the position of the devices in the window.
Utility
The utility tab includes meter sensors (Energy / Gas / P1 / YouLess / Voltage / AD / Air Quality / …), percentage, text and lux sensors and thermostats (for setting setpoints)
Each item has the following options:
- Favorite push icon (to display this device on the Dashboard tab)
- #Log (Displays the log)
- #Edit (Edit device parameters)
- #Timers (For setting up a time schedule for thermostat setpoints)
- #Notifications (see Notification chapter)
By Dragging/Dropping the sensor items, you can change the position of the devices in the window.
Labels Compact/Mobile mode
When using the dashboard in compact or mobile mode, there is limited room for the current status.
Therefor the following labels apply:
- R = Return
- T = Today
- U = Usage
- A = Actual
Dashboard
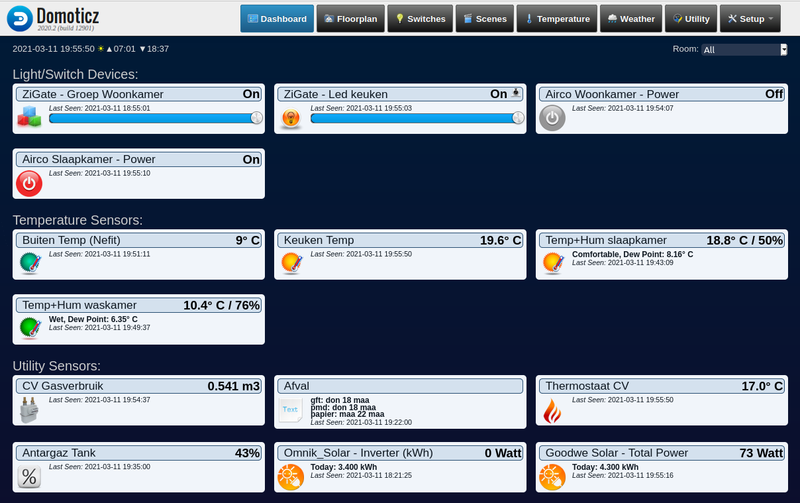
In the Dashboard all the devices are listed that you have flagged as favorite with the favorite toggle switch (star) on each device widget. They will be ordered on the dashboard in the same ways as on the tabs.
If you want to display a device only on the dashboard and not on the device tabs/pages you can make it hidden.
Floorplan
With Floorplans you can create a graphical interface of your home and rooms. When clicking on a room you will be zoomed in to view the room in more detail.
Switches can be activated directly from the floorplan. See the page Floorplans for more instructions.
If you want to display a device only on the floorplan and not on the device tabs/pages you can make it hidden.
Show Device Log
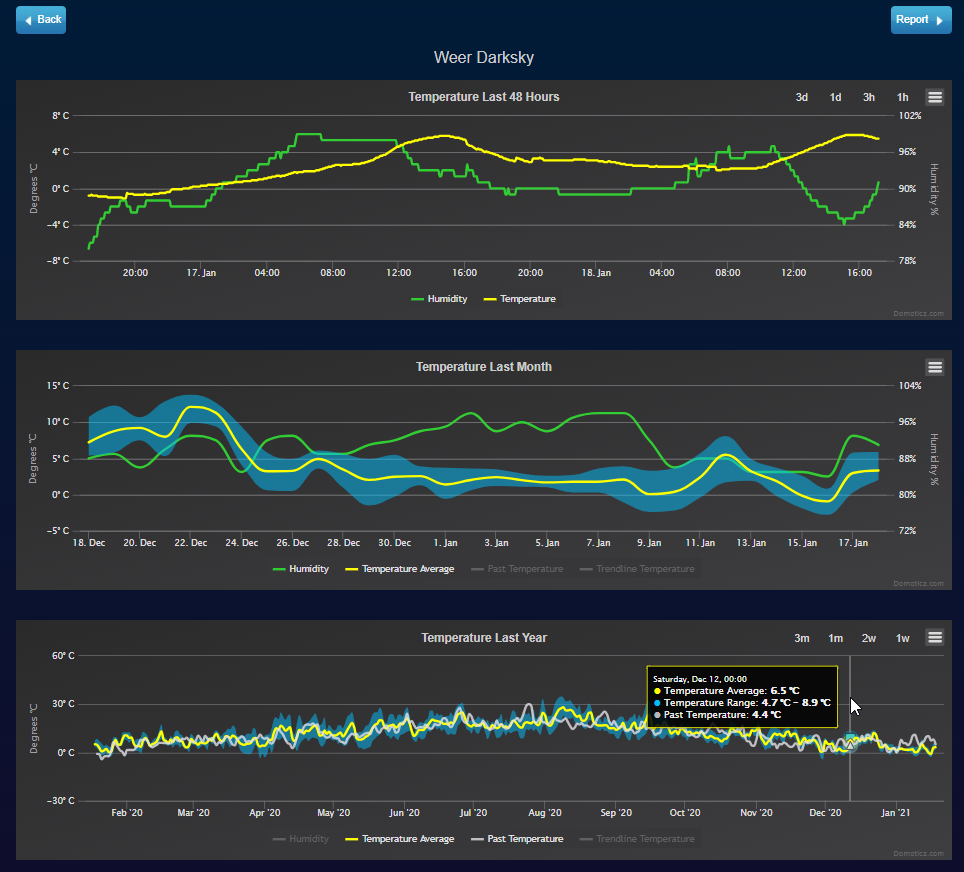
By pressing the log button you can see the log of the sensor. If the device logs numeric values they will be displayed as a graph per day/month/year. If the sensor logs text you will get a table of values.
For switches also the origin of the changed value will be displayed (script/user).
It is possible to zoom in/out by selecting a range. On mobile devices use double finger moves.
For temperatures and some other dataranges it is also possible to see the past month/year data next to the last month/year data. So you can visualize the difference. It is also possible to show a Trendline wich indicates the trend of the sensor value.
For some utility devices (eg Electricity, Gas, Water etc) a Comparison graph over the years is displayed
By pressing the BACK button you return to the overview.
By pressing on (Custom) Report you can go to the Report function. Here you see yearly and monthly reports and can you export them to excel.xls, .csv and image files for further processing.
Custom Graph
In the Temperature tab the is a Custom Graph reporting button where you can set out various sensor values in one graph.
For example the inside and outside temperature of last week.
Device Report
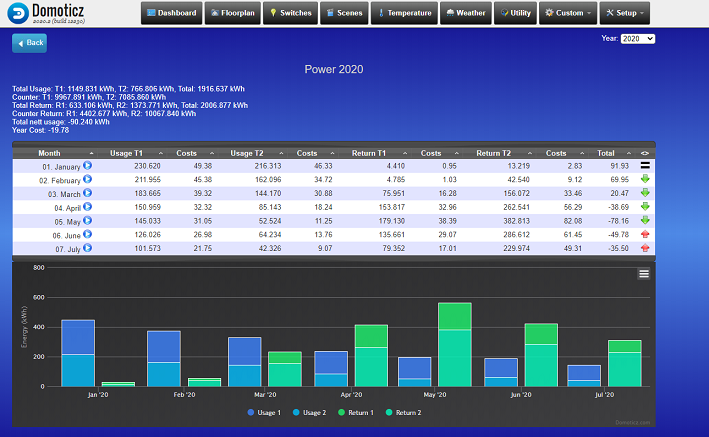
Most sensor devices have a Report button on the LOG page (see previous section). With the report you can go back in your history. It is also possible to export the data as images, CSV or Excel files.
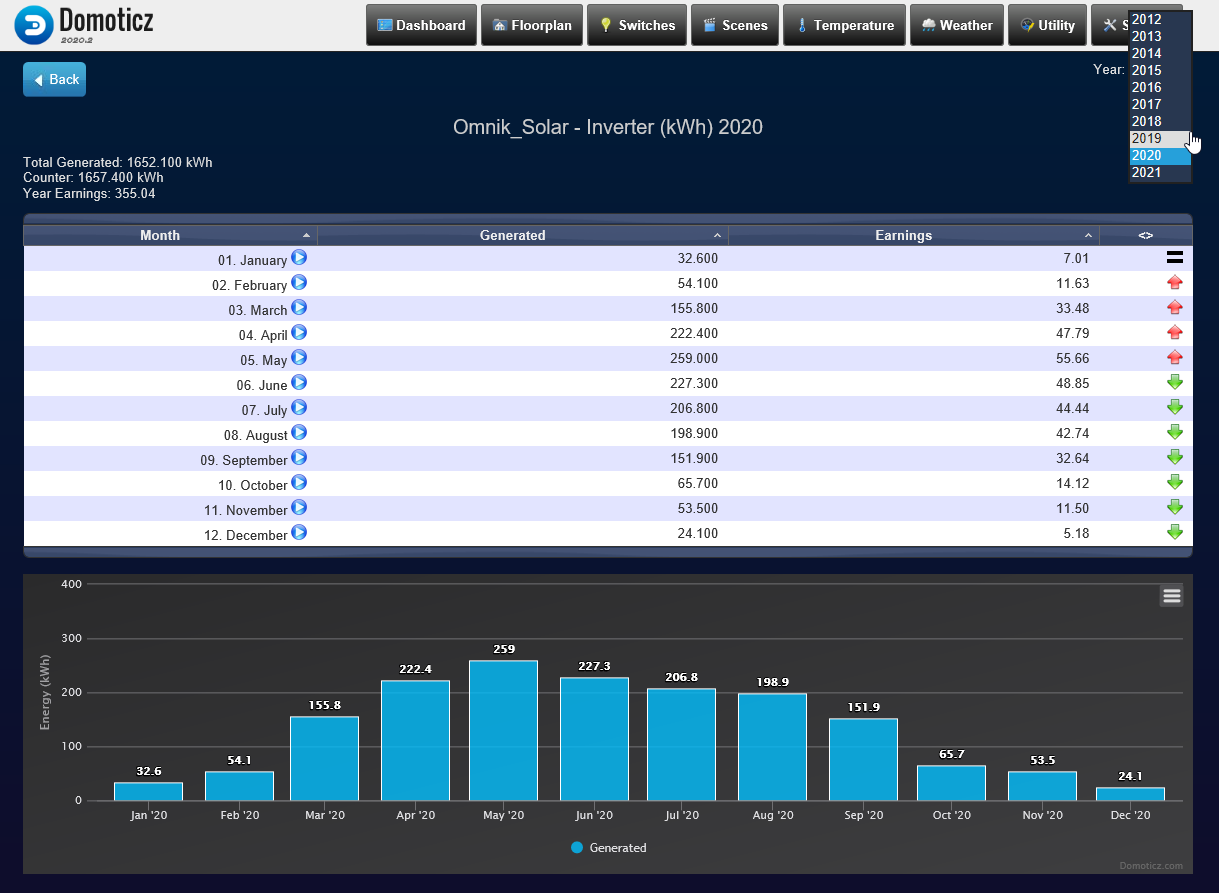
The up/down arrows in the last column indicate a increase or decrease value compared with the month or day earlier.
When click on the blue Arrow in the month column you get a detailed value report per day of that month.
For Temperature devices also the lowest and highest value are listed. For a year also the degree days is listed so you can compare your energy consumption for heating based on true values.
For energy devices a yearly summary is listed. The earning or costs are calculated by the tariffs set in the page Setup-Setting- Meters Counters. Also Day/night tarifs and delivery and return (eg from solar panels) are supported for P1 Smart Meter devices.
Example Reports Energy devices
Example reports Temperature device
Remove incorrect value from database
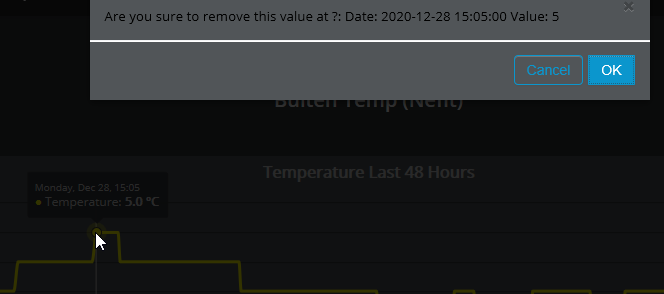
It is possible to remove (or delete) an incorrect sensor value (record) from the database by shift+left mouse click on the value in one of the graphs on the device log page. You will get a popup dialog to approve the removal.
On a tablet/smartphone without mouse: Select the to be deleted/removed value by clicking on it and thereafter click the pancake menu in right top corner. Then the acknowledgement popup will be shown.
NOTE: This function is not working on the report page so it is not possible to remove data with this function older than 1 year.
Exporting graph data
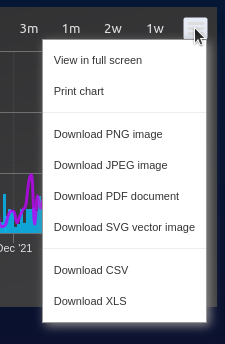
By clicking on the right top hamburger icon in a graph you can select the export data method of that graph
Options are to export into an image/document file (PNG, JPEG, PDF, SVG) or download the values as an CSV or Excel file.
If you want to export a specific time span use a Domoticz History API call.
Edit Device
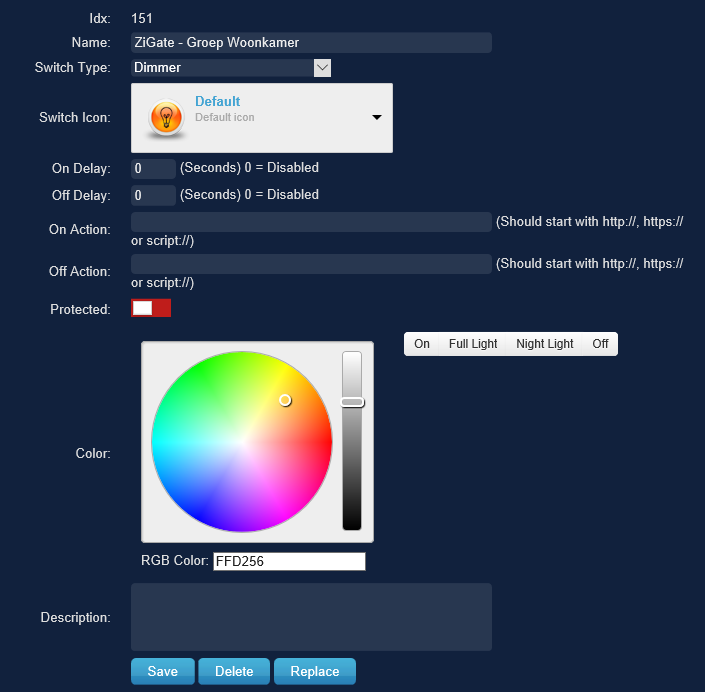
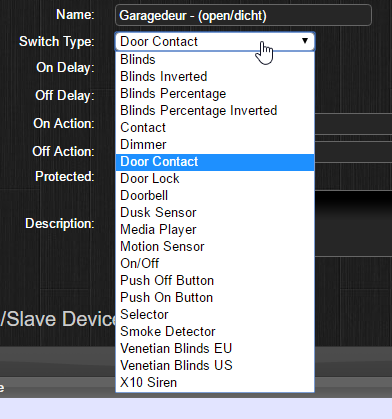
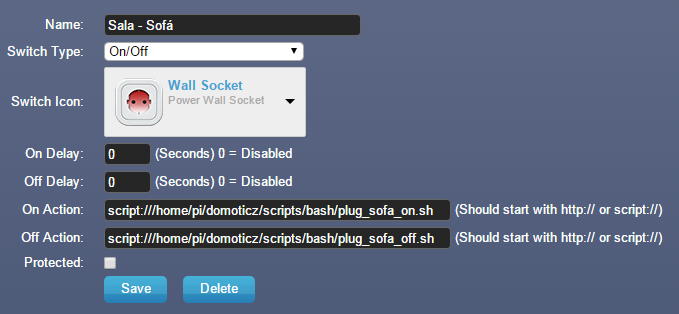
In this dialog you can rename the device, change the switch type, remove, or replace it.
Switches
Blinds: See special page for Blinds
Also you can add delays, extra actions by scripts or http API json commands, protect it for unauthorised usage etc.
Make Hidden
If you add a dollar ($) sign infront of the name (eg $device_name) the device becomes hidden (but active). It will disappear from the Sensor/Switches tabs. It still will be visible on the device list and can be used in the floorplan (room $Hidden Devices).
Also when you have made the device favorite before renaming the device stays visible on the dashboard.
Change Switch Type
In the edit dialog you can modify the type of switch. The other attributes depends on the type of switch.
For a full list and short description see wiki page Dummy_for_virtual_Switches#Switches
Change Icon
Here you can Change the Icon for the device. It is possible to use your own custom icons
On Off Delay
The On delay causes a device to switch On with a delay of the set amount of seconds after the switchOn command is given.
The Off delay on switch device causes a device to switch Off with a delay of the set amount of seconds after the device switched to On.
The Off delay on switch device in a Group/Scene causes a device to switch Off with a delay of the set amount of seconds after the switchOff command is given.
On Off Action
Here you can refer to scripts or Domoticz API/JSON URL to trigger other actions inside or outside Domoticz.
Also possible to use http/https URL's when the device can be switched in this way (eg ESPEasy, Tasmota, etc)
Protected
Enable (default Disabled) extra protection for switching of this device. This will give a popup when trying to switch the device.
The Switch/Light protection password is managed by setting Light/Switch Protection
Sensors
Sensor have less options to edit:
Make Hidden
If you add a dollar ($) sign infront of the name (eg $device_name) the device becomes hidden (but active). It will disappear from the Sensor/Switches tabs. It still will be visible on the device list and can be used in the floorplan (room $Hidden Devices).
Also when you have made the device favorite before renaming the device stays visible on the dashboard.
Change Icon
Here you can Change the Icon for the device. It is possible to use your own custom icons
Multiplier/Adjustment
Some Sensors like temperature have Adjustment or Multiplier field to calibrate the measured value with the real, to be displayed value.
Delete
To delete the device from the database click on the DELETE button. After confirmation the device and its stored values will be deleted.
Replace device
Some devices change their unique ID when a new battery is installed and will get a new idx ID in Domoticz. Also when migration from one hardware gateway to another (eg OpenZwave to Zwave-JS-UI) you could need to replace devices.
To move the old sensor data (history logging) to the new device act as follow:
- First, add (or is added by new gateway) the new device to the system, and call it for example ‘New UV Meter’.
- Next press the Edit button on the Old device, select replace and select the new Device. (In this case the devices called ‘New UV Meter’).
- Next press OK. Result:
- The old and new device will be merged and get the name and IDX of the old device. This will prevent changes in scripts that use this device.
- The new device will be deleted. (behavior since Stable 2022.1)
- If there is a hardware gateway difference between Old and New device (eg when switching from OZW to Zwave JS UI MQTT) the merged device (with old name and idx) will get the hardware gateway of the new device.
Edit Device Timers
Each switch, group, scene or thermostat device can be activated by timers to change the status or for thermostats the setpoint temperature.
There can be more timers per switch/thermostat so you can make a complete schedule.
They also make part of a timer plan so you can set up for example a holiday schedule for your lights.
The timer options are partly dependent of the switch type and Timer type.
To add a timer to the device fill in the setting parameters and click on button Add.
To modify an existing timer select the timer, modify the settings and click on button Update.
To copy a timer, select an existing timer, modify the settings and click on button Add.
To delete a timer, select an existing timer and click on button Delete.
Standard Settings
- Enable/Disable.
- Type: Trigger type for timers, Can be based on specific time, per day, month, year or based on delta against Sunrise or Sunset (which are calculated based on your location in Settings). See the list of timers types below the image.
- Time: The absolute time in hh:min to change status or setpoint of the device. Can also be a delta against before/after Sunrise/Sunset timer types, eg 1:30 hours before sunset
- Randomness: Add a randomness to the activation time. The Random timer delta can be set in the settings menu. Could be useful to switch lamps on/off more randomly on holiday timing schedules.
- Persistent: Will be available in all timer plans when enabled. (available from beta dd 20-12-2023)
- Command: The command for setting the device status. On or Off
Note: It will take several minutes after saving that the timer entries become active. So for testing purposes take a minimum of 2 minutes delta from current time.
Note: Domoticz calculates some events like Sunset and Sunrise, Twilight etc based on your location, so be sure you have set the location correctly in menu Setup -> Settings
Optional Settings
- Level:
- In case of a dimmer type you can set the dimlevel.
- In case of a selector switch the selector level
- Color: In case of a color RGB lamp you can set the color.
- Value: In case of a Thermostat this is the setpoint value.
- When and Days: (depends on Timer type). Short select the the days of the week the timers settings should be valid. Alternativly you can select the active days manually.
- Date: (depends on Timer type). Select a date from the popup calendar or type a date in yyyy-mm-dd format.
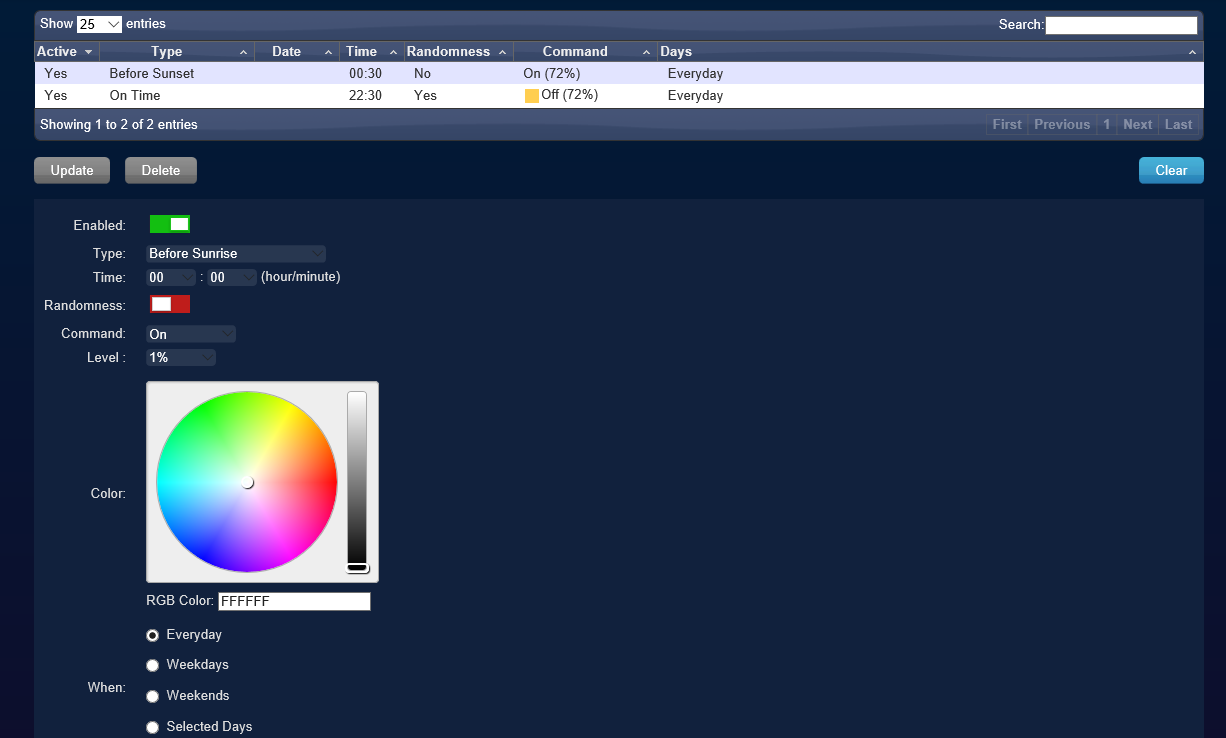
Timer types:
- 0: Before Sunrise
- 1: After Sunrise
- 2: On Time
- 3: Before Sunset
- 4: After Sunset
- 5: Fixed Date/Time
- 6: Odd Day Numbers
- 7: Even Day Numbers
- 8: Odd Week Numbers
- 9: Even Week Numbers
- 10: Monthly
- 11: Monthly (Weekday)
- 12: Yearly
- 13: Yearly (Weekday)
- 14: Before Sun at South
- 15: After Sun at South
- 16: Before Civil Twilight Start
- 17: After Civil Twilight Start
- 18: Before Civil Twilight End
- 19: After Civil Twilight End
- 20: Before Nautical Twilight Start
- 21: After Nautical Twilight Start
- 22: Before Nautical Twilight End
- 23: After Nautical Twilight End
- 24: Before Astronomical Twilight Start
- 25: After Astronomical Twilight Start
- 26: Before Astronomical Twilight End
- 27: After Astronomical Twilight End
For an explanation of Civil, Nautical and Astronomical Twilight check the wikipedia page: https://en.wikipedia.org/wiki/Twilight
Weekly timer editor
From version 2023.1 it is now possible to switch from table to grid view for easy creating an managing weekly timer schedules.
Click on the Grid tab to enable the week overview.
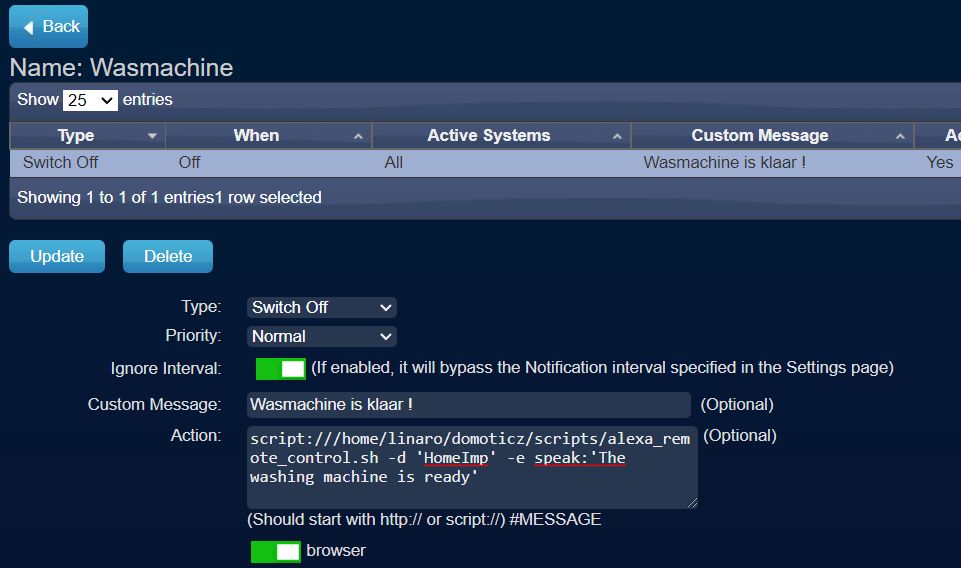
Edit Notifications
Each device has different notifications (depending on the hardware options).
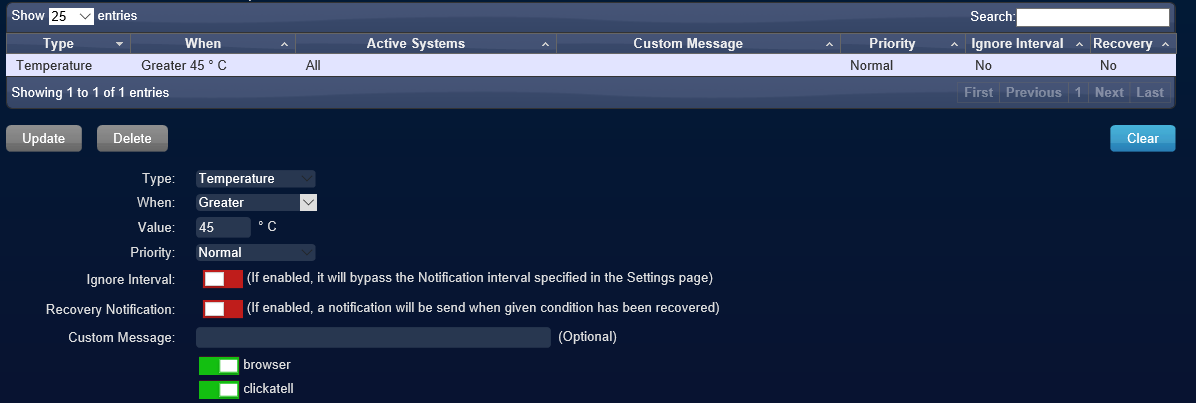
For example, in the above screenshot, you want to be notified if the temperature rises above 45 degrees.
Switches
Type: Can notify on Type Switch On or Switch Off state.
Level: For selector switches and dimmers a level condition can be added.
Custom Message: An optional custom message can be added.
Action: Optional a script can be added to run on notification trigger. For example to run a TextToSpeak notification.
Sensors
Can notify on Type:
- Value (Usage, Temperature, Today etc): When the measured value meets the conditions you entered (eg temperature rises above 45 degrees).
- Last Update: When the last update time was according your conditions (eg Last update time was larger dan 60 minutes away).
Also settings for
- Priority (of notification),
- Ignore default interval of settings page (enable/disable)
- Action: Optional a script can be added to run on notification trigger. For example to run a TextToSpeak notification.
- Recovery Notification (enable/disable when the sensor conditions have been recovered). This check box is only available for devices in Temperature, Weather and Utility tab. Not available for switches/light devices.
To add a notification to the device fill in the setting parameters and click on button Add.
To modify an existing notification select the notification, modify the settings and click on button Update.
To copy a notification, select an existing notification, modify the settings and click on button Add.
To delete a notification, select an existing notification and click on button Delete.
Notification systems
The following notification services are supported:
- Prowl (iPhone/iPad)
- NMA (Android)
- PushBullet
- Pushsafer (iOS/Android/Windows10/Chrome/Firefox) + Image
- Pushover (Android/iOs)
- Pushalot (Windows/Windows Phone)
- Clickatell SMS
- Custom HTTP/Action
- Kodi Media Player
- Logitech Media Server
- Google Cloud Messaging
- Telegram
See also the Applications Settings section Notification and the Notifications page for the various notification methods.


