Intergas Incomfort Heater control: Difference between revisions
Created page with "To connect the Intergas Incomfort LAN2RF Gateway, Domoticz includes standard support for the Incomfort. From version 2022.2 the thermostat setting also works with the V2 gateway. Make sure the Gateway, app and thermostat work as they should, then you can get started with Domoticz. Navigate to Settings -> Hardware Choose Intergas InComfort LAN2RF Gateway at the bottom under Type For example, type "Intergas InComfort" under name Set data Timeout to "not active". E..." |
mNo edit summary |
||
| Line 3: | Line 3: | ||
From version 2022.2 the thermostat setting also works with the V2 gateway. | From version 2022.2 the thermostat setting also works with the V2 gateway. | ||
=== Prerequisites === | |||
Make sure the Gateway, app and thermostat work as they should, then you can get started with Domoticz. | Make sure the Gateway, app and thermostat work as they should, then you can get started with Domoticz. | ||
=== Configure Domoticz === | |||
Navigate to Settings -> Hardware | Navigate to Settings -> Hardware | ||
Choose Intergas InComfort LAN2RF Gateway | Choose "Intergas InComfort LAN2RF Gateway as Type" and fill in the appropiate fields: | ||
For example, type "Intergas InComfort" | * Name For example, type "Intergas InComfort" | ||
* Data Timeout: "Disabled". | |||
* IP address: IP address of the LAN2RF Gateway under Remote address. | |||
* port: default 80 | |||
* username: admin | |||
* password: The password that is shown on the back of your gateway. (which you can change via the web interface if you point your browser at the IP address of the gateway) | |||
[[File:Intergas Incomfort gateway-.png]] | [[File:Intergas Incomfort gateway-.png]] | ||
Revision as of 22:02, 19 June 2025
To connect the Intergas Incomfort LAN2RF Gateway, Domoticz includes standard support for the Incomfort.
From version 2022.2 the thermostat setting also works with the V2 gateway.
Prerequisites
Make sure the Gateway, app and thermostat work as they should, then you can get started with Domoticz.
Configure Domoticz
Navigate to Settings -> Hardware
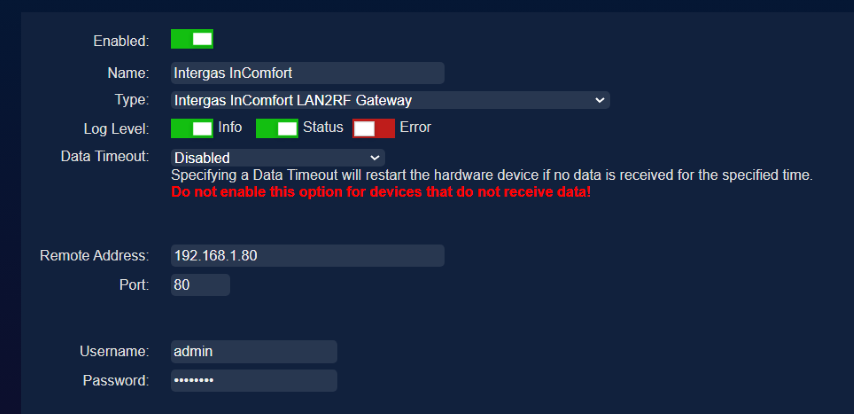
Choose "Intergas InComfort LAN2RF Gateway as Type" and fill in the appropiate fields:
- Name For example, type "Intergas InComfort"
- Data Timeout: "Disabled".
- IP address: IP address of the LAN2RF Gateway under Remote address.
- port: default 80
- username: admin
- password: The password that is shown on the back of your gateway. (which you can change via the web interface if you point your browser at the IP address of the gateway)
Once Domoticz has successfully established contact with the gateway, it will automatically create all devices.
Under Settings -> Devices, there are now 10 new devices. Click on the green arrows to add the devices to your overview.
You can then adjust the names to what makes sense to you (as has already been done below)
After this, you can simply operate the thermostat (the setpoint device)
The setpoint device is sometimes set to 0 by the real thermostat or the app, which makes it unusable in domoticz.
So set it to NOT ACTIVE (see the green arrow behind the device)

