Initial Raspberry Pi Setup
Installation
In order to enjoy Domoticz with best possible experience, use a USB mass storage device (e.g. a USB stick) to run it. Therefore you need RPi 4 or RPi 3B. To install Raspberry OS (Lite) on an SD card or USB mass storage device, follow the instructions given here. It is by far the easiest way. But you can also use the Classic Method, as described below, if you prefer.
[Classic method:]
- Use a Class 10 SD card
- Make sure you are using a Class 10 SD card. And a good one at that! This is important, cheap SD cards bought from eBay will cause you problems in future.
- Download the latest Raspbian Lite SD card image. https://www.raspberrypi.org/downloads/raspbian/
- Write the image to your SD card (follow these instructions if you need help) Windows,Mac OS X, Linux.
[/Classic Method]
- Because SSH is disabled by default, place an empty file name 'SSH' on the SD-card or USB MSD to enable SSH on boot (only needed if you have no keyboard and monitor connected to the RPi).
- The Raspberry Pi should be unplugged from the 5V power.
- Put the SD card or USB MSD in your Pi and connect a mouse, keyboard, Ethernet cable and monitor. Finally, plug in the micro USB power supply. This action will turn on and boot your Raspberry Pi.
First time startup
The default username and password are pi and raspberry
Getting an IP Address with Local Access
The Raspberry Pi image is configured with DHCP, meaning it will automatically fetch an IP Host Address, Gateway Address and DNS Address from your router.
If you additionally connect to your router after the Raspberry Pi is running and find its 'DHCP' section, you will be able see the IP Address assigned to the Raspberry Pi (these are sometimes called 'leases').
Otherwise connect the Raspberry Pi to a monitor and keyboard to gain local access. Incidentally, if a monitor is connected during boot up, you will see at the end of the boot messages the IP Address assigned.
Turn on the Raspberry Pi with its monitor and you should eventually see the command line interface.
Login with the default username and password (pi/raspberry) and issue the following command:
ip addr show
Using SSH to Access the Raspberry Pi (Highly Recommended)
Enable SSH on a Headless (no monitor attached) Raspberry Pi
The original versions of Raspbian allowed the user to connect over SSH using the default username (pi) and password (raspberry).
This was (and is) perceived as highly insecure, as these devices would be open to intruders. In the event that you should require SSH
access as you have no other means to connect to the console (either HDMI or Serial), you should put a file named ssh
onto the boot partition of your SD card from another computer. When the Pi boots, it looks for the ssh file. If it is found, SSH is enabled
and the file is deleted. The content of the file does not matter; it could contain text, or nothing at all.
If you have loaded Raspbian onto a blank SD card, you will have two partitions. The first one, which is the smaller one, is the boot partition.
Place the file into this one.
Please remember to immediately change your password by issuing the following command once logged in:
passwd
In event that the ssh server does get troubles to connect to this fix is for resetting the certificates:
sudo rm /etc/ssh/ssh_host*
sudo dpkg-reconfigure openssh-server
Enable SSH on a Raspberry Pi with a monitor
Please remember to immediately change your password by issuing the following command once logged in:
passwd
- Launch Raspberry Pi Configuration from the Preferences menu
- Navigate to the Interfaces tab
- Select Enabled next to SSH
- Click OK
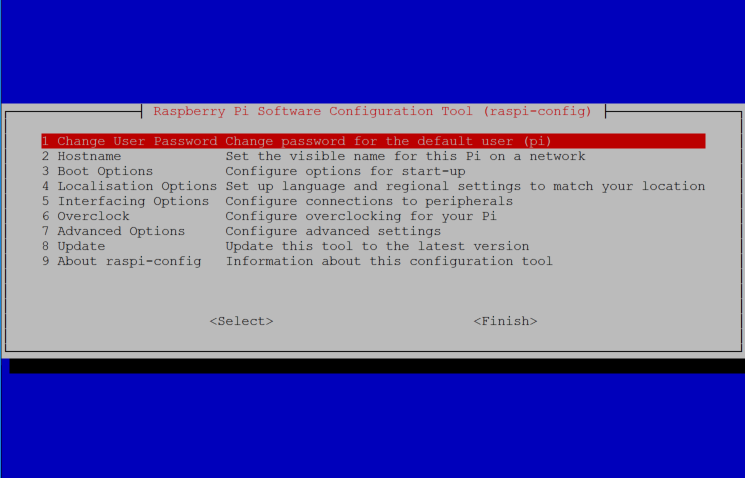
Alternatively, raspi-config can be used in the terminal:
- Enter in a terminal window
sudo raspi-config
- Select Interfacing Options
- Navigate to and select SSH
- Choose Yes
- Select Ok
- Choose Finish
Once you know the IP Address of the Raspberry Pi and you ha, you can use a SSH Client (Putty for example) to connect to the Raspberry Pi.
When you are using the SSH command line client in Linux or on Mac OS, you have to add the userid to the SSH command:
ssh pi@<ip-address>
Change the Time Zone and Expand File System

Once you are logged in, issue the following command:
sudo raspi-config
- Select the option to expand the root file system
- We highly recommend changing the password.
- Change the timezone to match your locale. Timezone settings is under Internationalization Options
- Optionally disable SSH (although enabling SSH means you can maintain a "headless" system by SSHing from your favourite computer, as highlighted above). The settings are under Advanced Options
- Select Finish and choose reboot
Additional setup information
Maintaining and Updating your System
Always Keep your OS up to Date!
It is always essential to keep your system in good shape.
This can be simply done by either logging in locally or remotely by SSH and typing the following commands:
 sudo apt-get update
 sudo apt-get upgrade -y
(adding -y to the command tells apt to accept all prompts (rather than answering them manually with a 'Y')
Shutdown Properly!
I would like to stress, that you DO NOT TURN OFF a system by unplugging the power cable!
This is especially NOT good for Unix systems running from an SD Card. This will eventually result in a broken/damaged file system causing no end of problems later on such as misbehaving operation (bugs that are not there) to a Raspberry Pi unable to boot. It might reboot OK the first time but it's like spinning a Roulette wheel - one day it won't come back. You have been warned!...
To turn off the system properly, login via SSH (or locally via Keyboard/Mouse/HDMI) and type:
sudo poweroff