UPS Pico
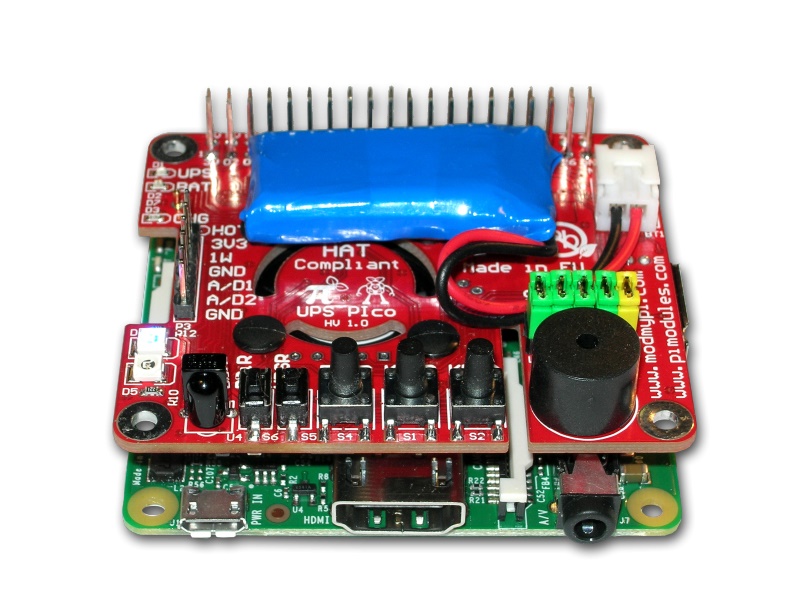
Purpose
PAGE IS UNDER CONSTRUCTION - PLEASE ADVISE JFHAUTENAUVEN ON THE FORUM IS SOMETHING GETS WRONG HERE UNDER
This script will get the current state from your UPS Pico and save it in different variables in Domoticz.
It uses the standard commands over I2C to get the information from the UPS Pico.
These commands can be found in the manual of the UPS Pico here :
http://pimodules.com/_pdf/UPS_PIco_Manual.pdf (starting at page 17 as of 14/03/2016)
Change log
- 16/03/2016
- Added Domoticz devices use example
- Added UPS Pico Buzzer ON/OFF/AUTO switch/selector to the Sensors/Switches section
- Added UPS Pico Fan ON/OFF switch to the Sensors/Switches section
- Added UPS Pico Fan Level switch/selector to the Sensors/Switches section
- Added UPS Pico charger state switch to the Sensors/Switches section
- Text formattig
- Added the "Important information" subsection in the Python Status Script - CronTab section
- Updated the Python Status Script to v1.0.1 : script now includes the Battery Charger Status function
- Update all the other Python scripts to v1.0.1 to fix mistake in script (dependency problems)
- Added the UPS Pico auto fan control using blockly section + finished the fan speed control section
- Added the UPS Pico Fan Mode switch screenshots and Blockly example
- 14/03/2016
- Post of the first article
Dependencies - hardware / software / operating system
Hardware platform
- Raspberry pi 2
- UPS pico HW v1.0 and v1.1
Firmware UPS Pico
- Firmware version : 5C
- All the information below is given using UPS Pico firmware version 5C and it's related documentation
Software dependencies
- Python
- I2C Tools
Operating system
- Linux / Raspbian / Domoticz SD card
Domoticz Setup - switches, variables, version
For the purpose of the integration with the UPS Pico, we will first need to create virtual devices in order to send them the data.
We will also make sure that domoticz is set up so that communication / JSON calls from localhost is password free.
Sensors/Switches
Here is the list of sensors that needs to be created in order to have all the information from the script injected inside domoticz.
It's up to you to use these or not but keep in mind that if you don't use them, the python script will need to be modified accordingly, else you'll start receive mails from cron to notify updates failed
| Sensor Name | Sensor Type | Sensor Subtype |
|---|---|---|
| UPS Pico Blue Led | Light/Switch | Switch |
| UPS Pico Red Led | Light/Switch | Switch |
| UPS Pico Battery Voltage | General | Voltage |
| UPS Pico RPi Voltage | General | Voltage |
| UPS Pico Battery temperature | Temp | THR128/138, THC138 |
| UPS Pico Rpi fan temperature | Temp | THR128/138, THC138 |
| UPS Pico firmware version | General | Text |
| UPS Pico Power Source | General | Text |
| UPS Pico Battery activated | Light/Switch | Switch |
| UPS Pico Battery Level | General | Percentage |
| UPS Pico Buzzer Control ON/OFF/AUTO | Light/Switch | Switch (use Selector type) |
| UPS Pico Fan Control ON/OFF | Light/Switch | Switch |
| UPS Pico Fan Speed Control | Light/Switch | Switch (use Selector type) |
| UPS Pico Charger State | Light/Switch | Switch |
Domoticz configuration
- Go to the Domoticz settings page
- Go on the "Local Network" page where you can set IP's that do not need password to connect to the system
- Add 127.0.0.1 inside the textbox
- Do not forget to click on the save button before exiting the page
Python installation
You now have to make sure that python is installed on your Rpi
Issue these commands in order to make sure that you have everything needed
sudo apt-get update
sudo apt-get upgrade
sudo apt-get install python-rpi.gpio
sudo apt-get install python-smbus
(Optional) Update the Rpi to the latest firmware
This step is optional by I would recommend to follow it in order to make sure that everything is up to date on the Rpi
sudo apt-get install rpi-update
sudo rpi-update
sudo reboot
Once the Rpi is rebooted, you can carry on
UPS Pico installation
Depending on the model of UPS Pico used, or at least depending on the firmware that is running on it, the instructions hereunder could vary a bit.
The information presented is supposed correct as of 14/03/2016 using a UPS Pico HW v1.1 and firmware version 5C published in february 2016.
- With the Rpi completely off and disconnected from the USB power source, plug the UPS Pico module into the GPIO expansion port of the Raspberry Pi
- Make sure that you have connected the battery on the UPS Pico before going any further
- Make sure that all the little jumpers on the upper face of the UPS Pico board are inserted
- Plug the USB Power source into the Raspberry Pi. The Rpi should now power up and the UPS Pico should start flashing red and blue LEDs
- Open a session on the Raspberry Pi, you may use either pi user or root
- At this point, ensure that you have a stable and working network connection and also have plugged a power supply that is at least 2A for Rpi2 or 3A for Rpi3
- Issue the following command to enter the Rapsberry Pi configuration utility
sudo raspi-config
- Scroll to advanced options
- Then to A7 I2C interface and set this to enabled
- Select Yes, to set the kernel to be loaded by default
- Then scroll to A8 Serial, and ensure this is enabled (it is usually enable by default anyway)
- Exit the configuration manager
- Reboot the Raspberry Pi by issuing the following command
sudo reboot
- Once the Rpi is rebooted we need to install i2c-tools in order to communicate with the UPS Pico trough I2C. We also need to set up the I2C stuff. Issue the following commands
sudo apt-get install i2c-tools
- We now need to modify the file/etc/modules to activate the module. So edit the file with nano and add the following two lines at the end of the file
- i2c-bcm2708
- i2c-dev
sudo nano /etc/modules
- Make sure you saved the file correctly and that it saved your changes by typing the following command. You should see the two new lines at the end of the file.
sudo cat/etc/modules
- If everything looks fine so far, you can reboot the system once again
- When the Pi re-starts, check that i2c is running by using the following command. The UPS Pico will list as a device in Line 60, Col 8:9:a:b
sudo i2cdetect -y 1
PS : if you are using a RPi 1, replace the "1" argument with a "0"
- If the UPS Pico did show up correctly after the last command, we can now proceed with the installation of the supporting files from pimodules.com. Make sure you are in your home folder then issue the following commands.
mkdir UPSPico
cd UPSPico
wget http://www.pimodules.com/_zip/UPS_PIco_Supporting_Files.zip
unzip UPS_PIco_Supporting_Files.zip
ls
- At this stage you should see some python scripts into the directory. They come from the package we just downloaded and unzipped.
- You can check the details about your UPS Pico by running the status script provided by issuing the following command
sudo python pico_status.py
- Check that everything looks fine on the status result and take note of the firmware version currently installed. It may be useful later in this guide if you wish to update your UPS Pico firmware
- Now we can execute the FSSD script to ensure the UPS Pico can run correctly in case of a power outage. Keep an eye on the flashing LED on the UPS Pico and issue the following command
sudo python /home/pi/picofssd.py
- If everything is working correctly, the LED should blink a bit slower than before. Proving that the script and UPS work together. Stop by hitting CTRL+C. The LED will blink faster again. This is normal.
- Now we will ask the system to start the script at system boot. For this purpose we need to add the following lines into the /etc/rc.local file, at the end of the file
- sudo python /home/pi/picofssd.py &
- echo ds1307 0x68 > /sys/class/i2c-adapter/i2c-1/new_device
- sleep 4;
- hwclock -s;
- Here is the meaning of those lines
- The first line starts the script for the UPS
- The second line sets up the Real Time Clock (RTC) from the UPS to be used by the Raspberry Pi
- The third line allows to wait a little that the RTC is ready to be used by the system
- The fourth line reads the content of the RTC of the UPS and sets the system date to that value
- Save the file and now, make sure the script can be executed by issuing the following command.
sudo chmod +x /etc/rc.local
- You can now, once again reboot your Raspberry. When it will boot, pay close attention to the LED on the UPS Pico, it should be blinking really fast at first, then slow down once the rc.local stuff has been executed.
- If you observed the behaviour described above, carry on
- In order for the RTC to work correctly, it would be good to write the actual date and time inside it. Let's first check the stored date and time in it and update it if necessary by issuing the following commands
sudo hwclock -r
sudo date
sudo hwclock -w
- If the difference between the hwclock and the date is significant, execute the third command to sync them
- The install procedure is now completed !
UPS Pico configuration
This section will explain some options that can be changed on the UPS Pico in order to help you set it the way you prefer.
For example you can change the battery run time, or the cooling fan (optional) behaviour, even the buzzer
- Changing the battery run time : you can issue this command to set the battery run time of the device when power is lost
- XX can range from 15 to 254
- When XX is set to 255, the device will run until the battery is flat, then shutdown the Raspberry ASAP
i2cset -y 1 0x6b 9 XX
- To be continued
UPS Pico firmware update
This section covers the procedure to update the firmware of the UPS Pico when an update is posted on the pimodules.com website
- Open the Raspberry pi settings assistant
sudo raspi-config
- Go to advanced, then serial and disable the serial interface
- Reboot the Rpi
- Go to the UPSPico folder you created in the steps of the installation and download there the firmware package and unzip it, then we install it by issuing the following command
- UPS_Pico.hex should be replace with the name of the firmware you just downloaded. Make a ls to check the firmware name if you don't know it.
- Do not power off the Rpi when the upgrade process is running
sudo wget http://www.pimodules.com/_zip/UPS_PIco_Firmware_Update.zip
unzip UPS_PIco_Firmware_Update.zip
sudo i2cset -y 1 0x6b 0x00 0xff && sudo python picofu3.py -v -f UPS_PIco.hex
- After the upgrade is completed, it is advised to shutdown the Rpi completely by issuing the following command
sudo shutdown -h now
- Do not forget to reactivate the serial port in the Rpi config manager after having rebooted the Rpi
Integration of the UPS Pico with Domoticz
This section covers the steps and scripts needed in order to update the values in domoticz with the values contained in the UPS Pico
This section will also cover scripts that allow the user to control the LEDs, Switches, Buzzer and Fan speed of the UPS Pico from Domoticz
Important note : always make sure that after creating the scripts here under into your system, you give them the rights to execute by issuing the following command :
sudo chmod +x SCRIPTNAME.py
Python Status Script
This script is a modified version of the script provided by the manufacturer with the following added features
- Possibility of sending the data to the domoticz server using JSON API
- Calculation of the battery charge percentage using linear estimation of the discharge
#!/usr/bin/python
# Author : JF Hautenauven
# Description : Script that get the status of the UPS Pico and sends it back to Domoticz
# Version : 1.0.1
# Credits : to pimodules.com for providing the documentation
import sys
import ssl
import smbus
import time
import datetime
import time
from urllib2 import urlopen
# change these values
# domoticz = URL to the Domoticz server
# idx_ are the id's of the devices corresponding to the data in domoticz
domoticz = "PUT YOU HTTP PATH TO DOMOTICZ HERE"
idx_PoweringMode = XX
idx_BatteryVoltage = XX
idx_RpiVoltage = XX
idx_BatteryTemperature = XX
idx_RpiFanTemperature = XX
idx_FirmwareVersion = XX
idx_BatteryActiveSignal = XX
idx_BatteryLevelPercentage = XX
idx_BatteryChargerStatus = XX
# End
i2c = smbus.SMBus(1)
def pwr_mode():
data = i2c.read_byte_data(0x69, 0x00)
data = data & ~(1 << 7)
if (data == 1):
return "RPiPowered"
elif (data == 2):
return "BATTERY"
else:
return "ERROR"
def pwr_mode_numeric():
data = i2c.read_byte_data(0x69, 0X00)
data = data & ~(1 << 7)
return data
def bat_level():
time.sleep(0.1)
data = i2c.read_word_data(0x69, 0x01)
data = format(data,"02x")
return (float(data) / 100)
def rpi_level():
time.sleep(0.1)
data = i2c.read_word_data(0x69, 0x03)
data = format(data,"02x")
return (float(data) / 100)
def fw_version():
time.sleep(0.1)
data = i2c.read_byte_data(0x6b, 0x00)
data = format(data,"02x")
return data
def sot23_temp():
time.sleep(0.1)
data = i2c.read_byte_data(0x69, 0x0C)
data = format(data,"02x")
return data
def to92_temp():
time.sleep(0.1)
data = i2c.read_byte_data(0x69, 0x0d)
data = format(data,"02x")
return data
def ad1_read():
time.sleep(0.1)
data = i2c.read_word_data(0x69, 0x05)
data = format(data,"02x")
return (float(data) / 100)
def ad2_read():
time.sleep(0.1)
data = i2c.read_word_data(0x69, 0x07)
data = format(data,"02x")
return (float(data) / 100)
def getBatteryPercentage():
time.sleep(0.1)
dataVolts = bat_level()
dataLevel = ((dataVolts-3.4)/0.8)*100
return dataLevel
def getBatteryChargerState():
time.sleep(0.1)
data = i2c.read_word_data(0X69, 0X10)
return data
# Powering Mode
response= urlopen(domoticz+'/json.htm?type=command¶m=udevice&idx='+str(idx_PoweringMode)+'&nvalue=0&svalue='+str(pwr_mode()))
response.read()
#Powering Mode numeric
if pwr_mode_numeric() == 2:
response= urlopen(domoticz+'/json.htm?type=command¶m=switchlight&idx='+str(idx_BatteryActiveSignal)+'&switchcmd=On')
else:
response= urlopen(domoticz+'/json.htm?type=command¶m=switchlight&idx='+str(idx_BatteryActiveSignal)+'&switchcmd=Off')
response.read()
# Battery Voltage
response= urlopen(domoticz+'/json.htm?type=command¶m=udevice&idx='+str(idx_BatteryVoltage)+'&nvalue=0&svalue='+str(bat_level()))
response.read()
# Rpi Voltage
response= urlopen(domoticz+'/json.htm?type=command¶m=udevice&idx='+str(idx_RpiVoltage)+'&nvalue=0&svalue='+str(rpi_level()))
response.read()
# Firmware Version
response= urlopen(domoticz+'/json.htm?type=command¶m=udevice&idx='+str(idx_FirmwareVersion)+'&nvalue=0&svalue='+str(fw_version()))
response.read()
# Battery temperature
response= urlopen(domoticz+'/json.htm?type=command¶m=udevice&idx='+str(idx_BatteryTemperature)+'&nvalue=0&svalue='+str(sot23_temp()))
response.read()
# Raspberry fan temperature
response= urlopen(domoticz+'/json.htm?type=command¶m=udevice&idx='+str(idx_RpiFanTemperature)+'&nvalue=0&svalue='+str(to92_temp()))
response.read()
# Battery Level Percentage
response= urlopen(domoticz+'/json.htm?type=command¶m=udevice&idx='+str(idx_BatteryLevelPercentage)+'&nvalue=0&svalue='+str(getBatteryPercentage()))
response.read()
#Battery Charger Status
if pwr_mode_numeric() == 1:
response= urlopen(domoticz+'/json.htm?type=command¶m=switchlight&idx='+str(idx_BatteryChargerStatus)+'&switchcmd=On')
else:
response= urlopen(domoticz+'/json.htm?type=command¶m=switchlight&idx='+str(idx_BatteryChargerStatus)+'&switchcmd=Off')
response.read()
Python Status Script - CronTab
This section covers how to set up crontab to run the script every minute to update the Domoticz values
It's up to you to set the time higher or lower depending on you personal preferences
- Make sure you have copied the script some place accessible and that the script can be executed
- Wrap the script into a bash script using sudo python to run the script itself
- Add the following lines to the wrapper file
#!/bin/bash

# Optionally set PYTHONPATH
export PYTHONPATH=/path/to/python/libraries:$PYTHONPATH

# Run your script with your preferred Python installation
# in case you have more than one
python /home/pi/scripts/UPSPico/upspicostatus.py
sudo nano /home/pi/scripts/UPSPico/upspicostatusWrapper.sh
- Open crontab by issuing the following command
- Add the following line to the end of the file : * * * * * /home/pi/scripts/UPSPico/upspicostatusWrapper.sh
su root
crontab -e
- Now the crontab is set to update domoticz values every minute
Important information
- Since the script runs every minute, it could be possible that you receive a mail from the CRON service if Domoticz server is not running. Current version of the status script does not handle exceptions, so if the server is not avaible, the calls to the server will fail and you will receive an email. For the moment I have decided not to handle exceptions in the script so that it will fail when the Domoticz server is not running. It indicates me when Domoticz is not running.
- A mail could also be received from CRON when Domoticz is being updated because when Domoticz does updates, the Domoticz server becomes unavailable for the time of the update.
Python Led Script
This section covers python script to modify the value of the LED ON/OFF orders in the UPS Pico
These scripts can be improved if needed. They have been put togheter for testing and maybe are not production quality
Any help for this section is welcome
Python Blue Led Script ON
#!/usr/bin/python
# Author : JF Hautenauven
# Description : Script that get the status of the UPS Pico and sends it back to Domoticz
# Version : 1.0.1
# Credits : to pimodules.com for providing the documentation
import sys
import ssl
import smbus
import time
import datetime
import time
import os
from urllib2 import urlopen

os.system("sudo i2cset -y 1 0x6B 12 1")
Python Blue Led Script OFF
#!/usr/bin/python
# Author : JF Hautenauven
# Description : Script that get the status of the UPS Pico and sends it back to Domoticz
# Version : 1.0.1
# Credits : to pimodules.com for providing the documentation
import sys
import ssl
import smbus
import time
import datetime
import time
import os
from urllib2 import urlopen

os.system("sudo i2cset -y 1 0x6B 12 0")
Python Red Led Script ON
#!/usr/bin/python
# Author : JF Hautenauven
# Description : Script that get the status of the UPS Pico and sends it back to Domoticz
# Version : 1.0.1
# Credits : to pimodules.com for providing the documentation
import sys
import ssl
import smbus
import time
import datetime
import time
import os
from urllib2 import urlopen

os.system("sudo i2cset -y 1 0x6B 13 1")
Python Red Led Script OFF
#!/usr/bin/python
# Author : JF Hautenauven
# Description : Script that get the status of the UPS Pico and sends it back to Domoticz
# Version : 1.0.1
# Credits : to pimodules.com for providing the documentation
import sys
import ssl
import smbus
import time
import datetime
import time
import os
from urllib2 import urlopen

os.system("sudo i2cset -y 1 0x6B 13 0")
Python Buzzer Script
Python Buzzer Script AUTO
#!/usr/bin/python
# Author : JF Hautenauven
# Description : Script that get the status of the UPS Pico and sends it back to Domoticz
# Version : 1.0.1
# Credits : to pimodules.com for providing the documentation
import sys
import ssl
import smbus
import time
import datetime
import time
import os
from urllib2 import urlopen

os.system("sudo i2cset -y 1 0x6B 0x0E 0x02")
Python Buzzer Script ON
#!/usr/bin/python
# Author : JF Hautenauven
# Description : Script that get the status of the UPS Pico and sends it back to Domoticz
# Version : 1.0.1
# Credits : to pimodules.com for providing the documentation
import sys
import ssl
import smbus
import time
import datetime
import time
import os
from urllib2 import urlopen

os.system("sudo i2cset -y 1 0x6B 0x0E 0x01")
Python Buzzer Script OFF
#!/usr/bin/python
# Author : JF Hautenauven
# Description : Script that get the status of the UPS Pico and sends it back to Domoticz
# Version : 1.0.1
# Credits : to pimodules.com for providing the documentation
import sys
import ssl
import smbus
import time
import datetime
import time
import os
from urllib2 import urlopen

os.system("sudo i2cset -y 1 0x6B 0x0E 0x00")
Python Fan Script
Python Fan Script Control mode ALWAYS OFF
#!/usr/bin/python
# Author : JF Hautenauven
# Description : Script that get the status of the UPS Pico and sends it back to Domoticz
# Version : 1.0.1
# Credits : to pimodules.com for providing the documentation
import sys
import ssl
import smbus
import time
import datetime
import time
import os
from urllib2 import urlopen

os.system("sudo i2cset -y 1 0x6B 0x0F 0x00")
Python Fan Script mode ALWAYS ON
#!/usr/bin/python
# Author : JF Hautenauven
# Description : Script that get the status of the UPS Pico and sends it back to Domoticz
# Version : 1.0.1
# Credits : to pimodules.com for providing the documentation
import sys
import ssl
import smbus
import time
import datetime
import time
import os
from urllib2 import urlopen

os.system("sudo i2cset -y 1 0x6B 0x0F 0x01")
Python Fan Script OFF
#!/usr/bin/python
# Author : JF Hautenauven
# Description : Script that get the status of the UPS Pico and sends it back to Domoticz
# Version : 1.0.1
# Credits : to pimodules.com for providing the documentation
import sys
import ssl
import smbus
import time
import datetime
import time
import os
from urllib2 import urlopen

os.system("sudo i2cset -y 1 0x6B 0x10 0x00")
Python Fan Script ON FULL
#!/usr/bin/python
# Author : JF Hautenauven
# Description : Script that get the status of the UPS Pico and sends it back to Domoticz
# Version : 1.0.1
# Credits : to pimodules.com for providing the documentation
import sys
import ssl
import smbus
import time
import datetime
import time
import os
from urllib2 import urlopen

os.system("sudo i2cset -y 1 0x6B 0x10 0x01")
Python Fan Script ON 25 percent
#!/usr/bin/python
# Author : JF Hautenauven
# Description : Script that get the status of the UPS Pico and sends it back to Domoticz
# Version : 1.0.1
# Credits : to pimodules.com for providing the documentation
import sys
import ssl
import smbus
import time
import datetime
import time
import os
from urllib2 import urlopen

os.system("sudo i2cset -y 1 0x6B 0x10 0x02")
Python Fan Script ON 50 percent
#!/usr/bin/python
# Author : JF Hautenauven
# Description : Script that get the status of the UPS Pico and sends it back to Domoticz
# Version : 1.0.1
# Credits : to pimodules.com for providing the documentation
import sys
import ssl
import smbus
import time
import datetime
import time
import os
from urllib2 import urlopen

os.system("sudo i2cset -y 1 0x6B 0x10 0x03")
Python Fan Script ON 75 percent
#!/usr/bin/python
# Author : JF Hautenauven
# Description : Script that get the status of the UPS Pico and sends it back to Domoticz
# Version : 1.0.1
# Credits : to pimodules.com for providing the documentation
import sys
import ssl
import smbus
import time
import datetime
import time
import os
from urllib2 import urlopen

os.system("sudo i2cset -y 1 0x6B  0x10 0x04")
Domoticz devices settings
This section covers how to set up the devices we created in the first steps of this article in order to control the UPS Pico via the scripts above
Domoticz Led Switches
In order to have the cotrol over the LEDs on the UPS Pico, we now need to link the previously created switch to the pyhton scripts described above.
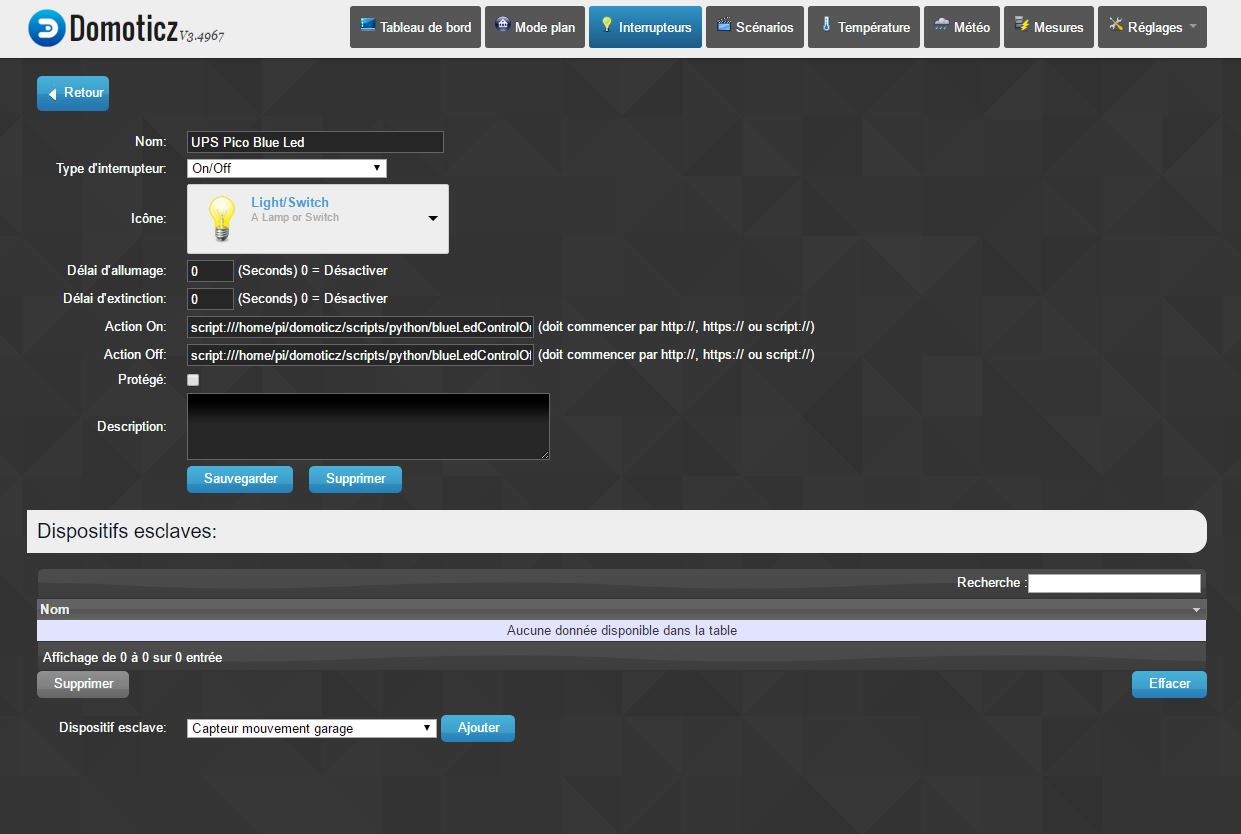
Here under, you can find a screenshot that depicts the configuration of the Blue Led switch.
The principle is simple
- Link the ON action of the switch to the python script that sends the command to light the LED up
- Link the OFF action of the switch to the python script that sends the command to light the LED off
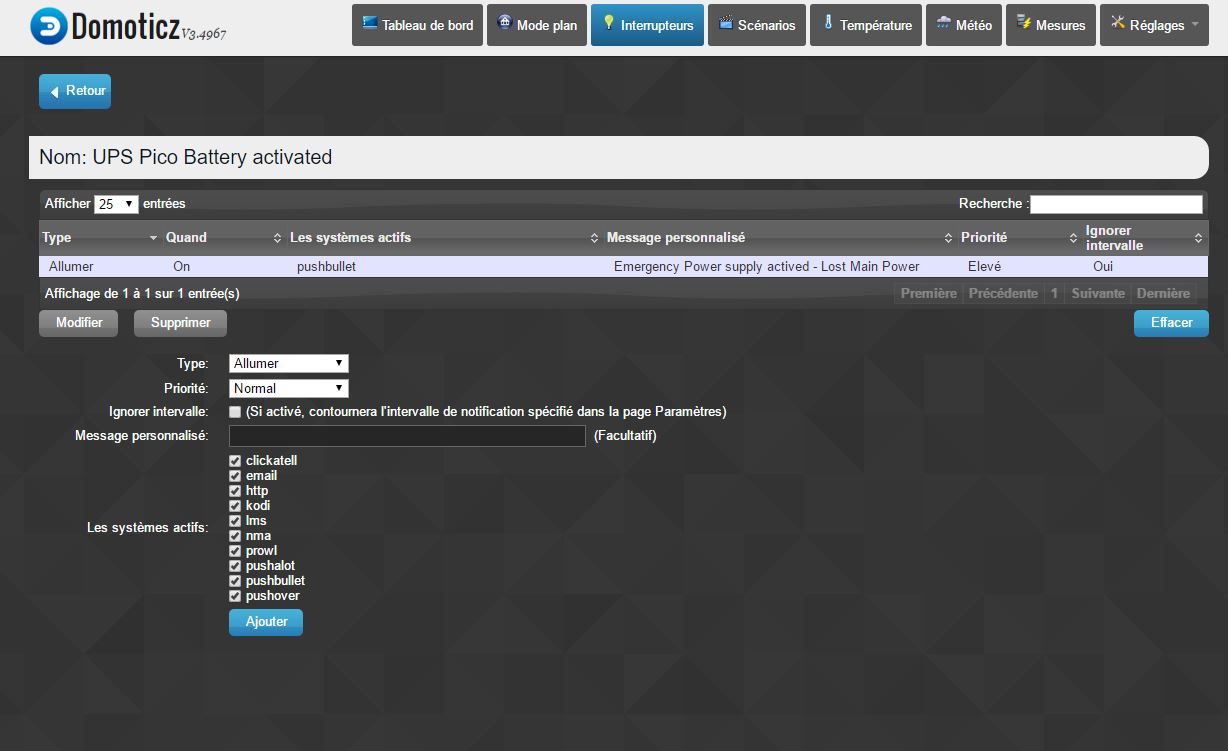
Domoticz Battery powered switch
In order to know if the system is running on batteries or not, you could for example set a notification to be sent by the Domoticz when this switch activates.
The function of that switch is to give a quick status of the system power state.
It's up to your personal preferences to put notification on this switch.
You could even activate other things when the switch goes on, such as voice synth to send a sound warning using your sonos, etc.
You can find here under a screenshot of a example with notification sending
Blockly example of LED use
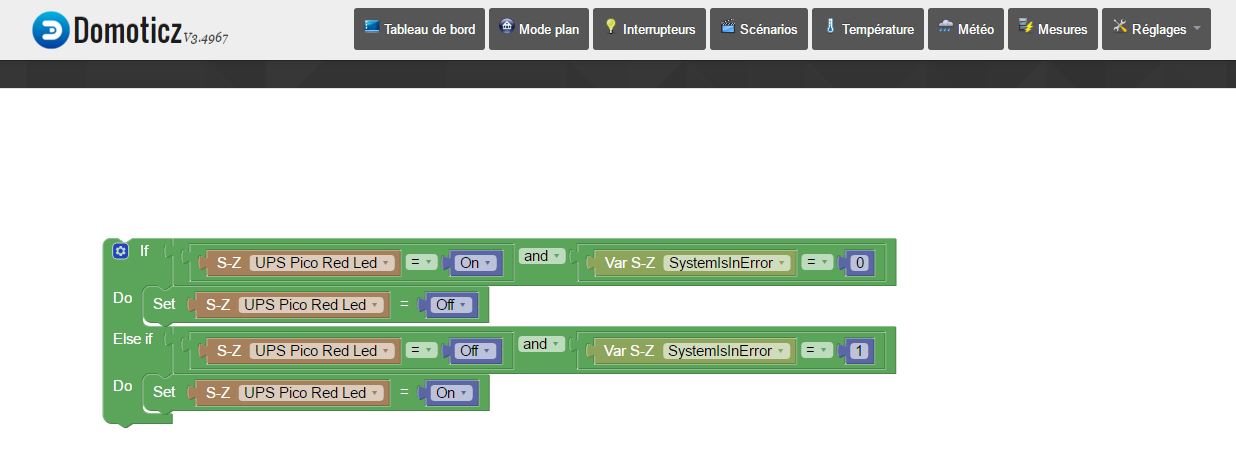
Here under is a small example of the Red LED of the UPS Pico beeing used to reflect the status of the Domoticz system.
The principle is this
- A user variable is defined in the domoticz setup, it's a variable that reflects if the system is in error or not. For example if my system temperature is above 50 degrees, a Blockly / or LUA script will set the variable to 1, meaning the system is in error.
- The script here under is an example of how to reflect if the system is in error using the RED led of the UPS Pico, so when the Blockly script is fired, if will check if the system is in error and the red LED is active
- If red LED is off and system is in error, the system will activate the switch corresponding to the red LED and subsequently fire up the python script that activates the LED.
- If red LED is on and system is not in error, the system will deactivate the switch corresponding to the red LED and subsequently fire up the python script that deactivates the LED.
This is just a really simple example and should only be considered as such. In my personal set up, I'm using various blockly scripts to :
- Light the RED light is the alarm system is triggered or if a sensor battery goes under 20 percent
- Blink the BLUE led fast if the system is running OK
- Blink the BLUE led slow if the system is running on batteries and battery percentage left is above 30 percent
- Blink both RED and BLUE led fast if the system is running on batteries and battery percentage left is under or equal to 30 percent
It's up to your personal preference once again to control the LEDs in such ways
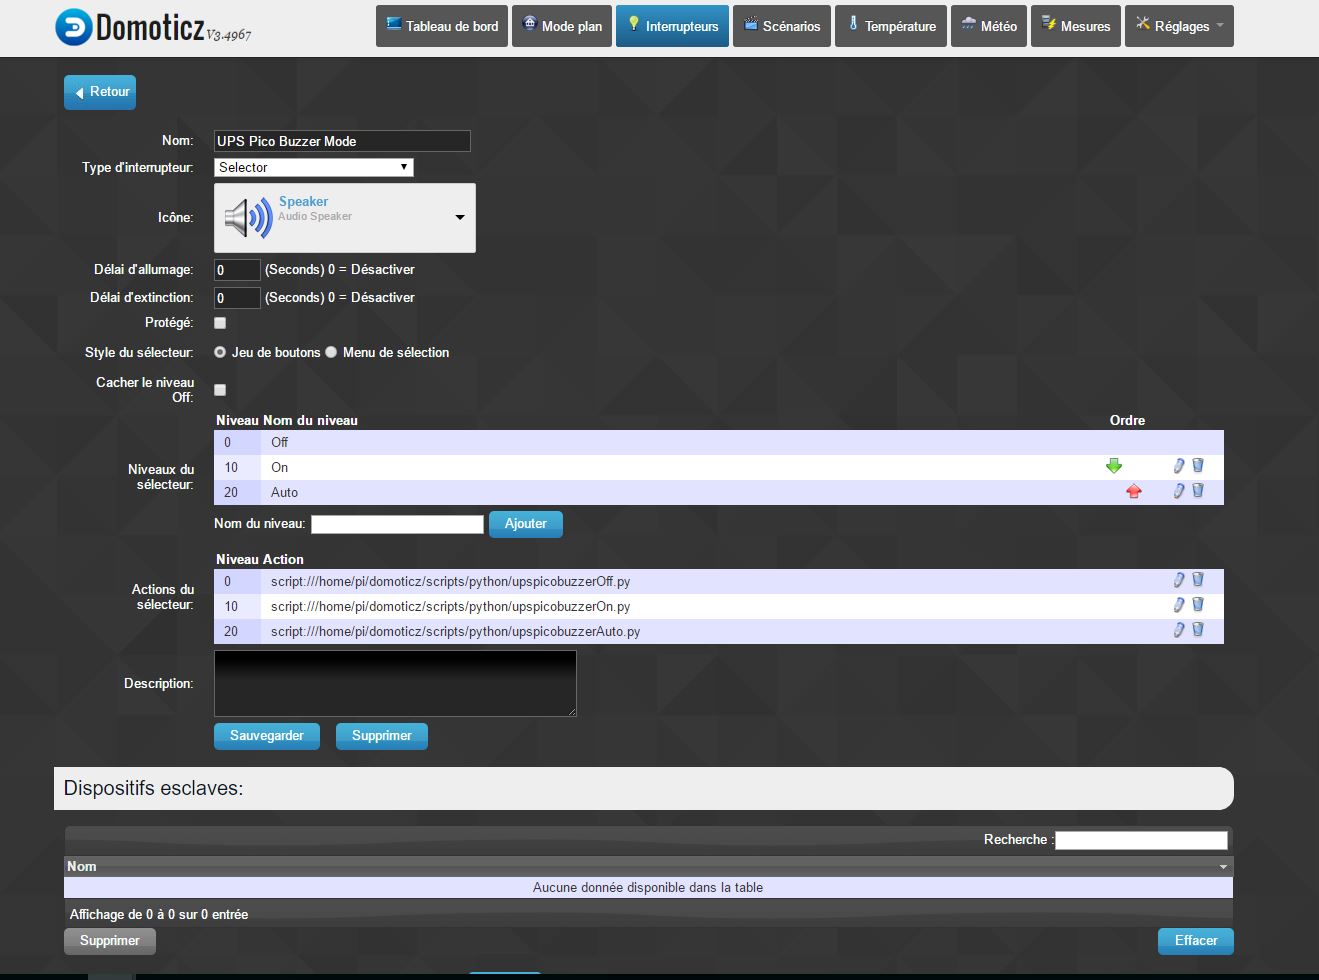
UPS Pico buzzer ON/OFF/AUTO control switch/selector
This selector switch will be used to fire up the python scripts related to these functions:
- Set the buzzer in automatic mode
- This means that the buzzer will only work the way it is programmed into the firmware itself, for example, it beeps when the system is running on batteries. Refer to the documentation on pimodules.com for further information
- Set the buzzer to inconditional OFF
- Set the buzzer to inconditional ON
Here under is a screenshot of what the selector configuration should look like:
UPS Pico fan ON/OFF control switch
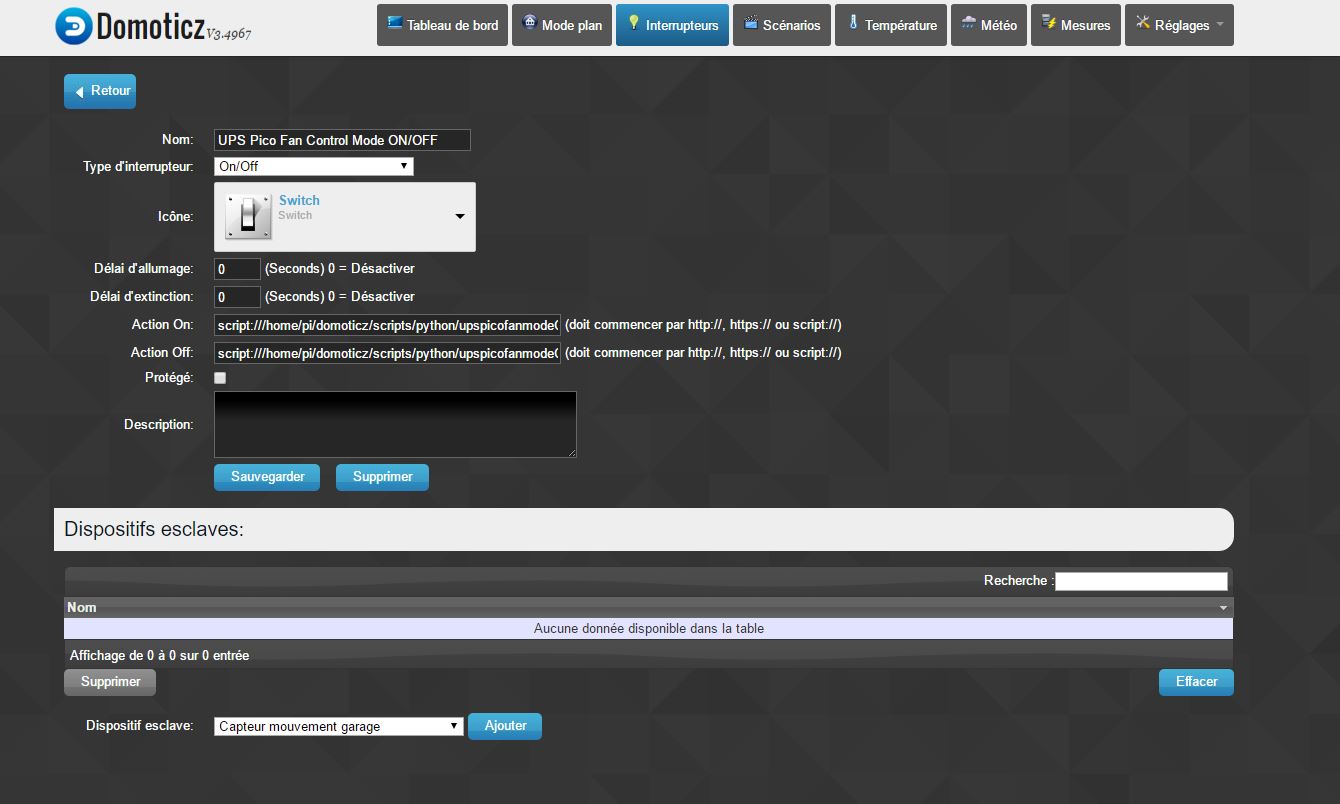
This switch can be used the same principle as the switches that control the LEDs
With the current UPS Pico firmware, be aware that once the fan mode has been set manually, for example using the scripts used above, the automatic mode is deactivated and for the moment, no information is given in the documentation about what command or parameter to issue on the I2C bus to reactivate automatic fan control mode.
The same way as described in the LED switch section, here is a screenshot looking how to configure the ON and OFF actions related to the switch to fire up the python scripts that allow to control the fan mode:
Here is an example of a Blockly script that will force enable or disable the UPS Pico fan. Please note that for the fan to run you also have to set it's speed to at least 25% (See Fan Speed selector part about this)
The purpose of the script is
- Activate the cooling fan if temperature is higher or equal to 40 degrees and deactivate the cooling fan under 40 degrees
- Deactivate the cooling fan is the system is running on batteries in order to save battery power. Normally the UPS Pico firmware does it also, but better safe than sorry.
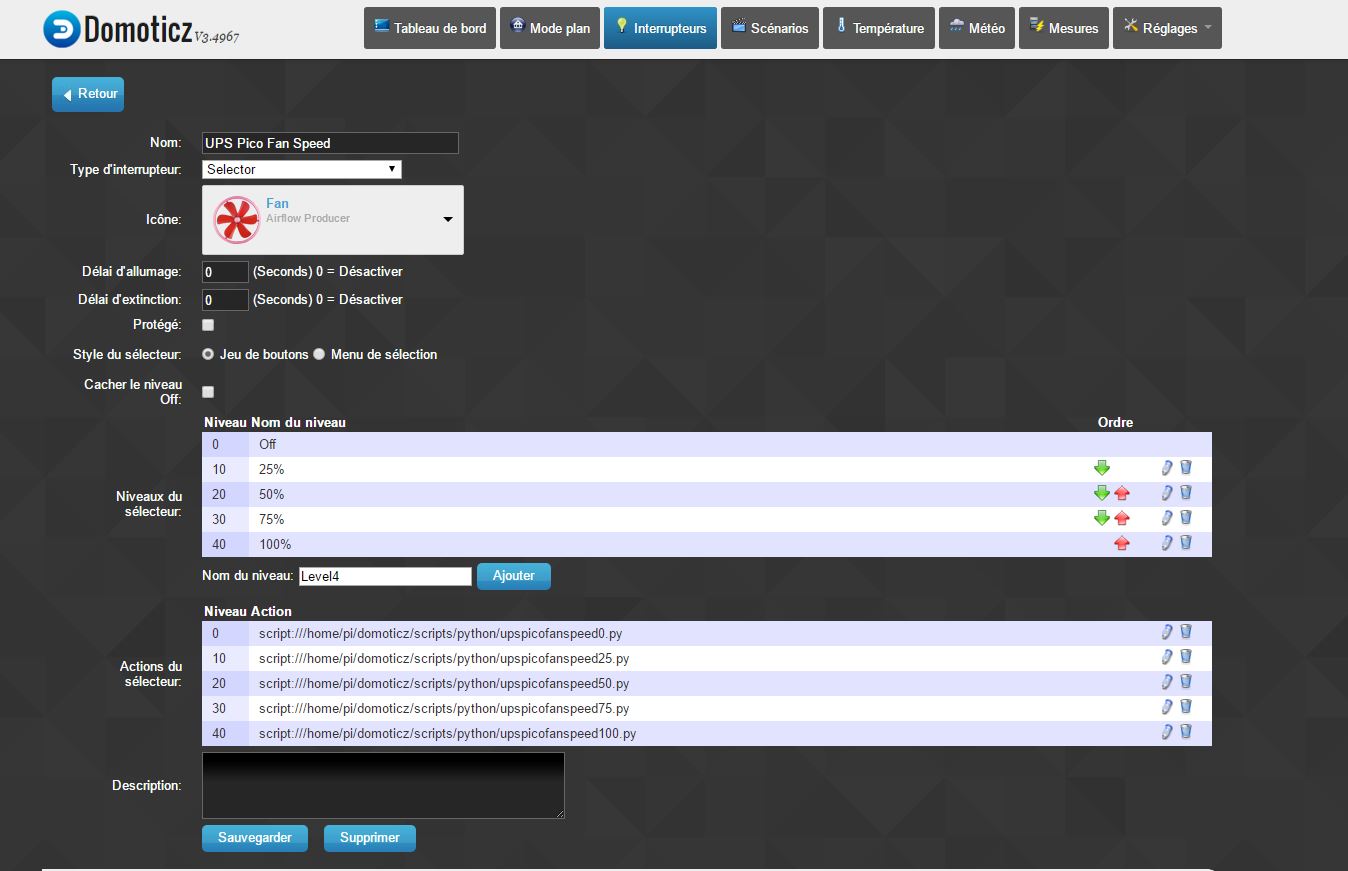
UPS Pico fan speed selector switch/selector
This selector switch will be used to fire up the python scripts related to these functions:
- Set the fan to inconditional OFF
- Set the fan to inconditional ON (aka. Full speed)
- Set the fan to 25 percent speed
- Set the fan to 50 percent speed
- Set the fan to 75 percent speed
Here under is a screenshot of what the selector configuration should look like:
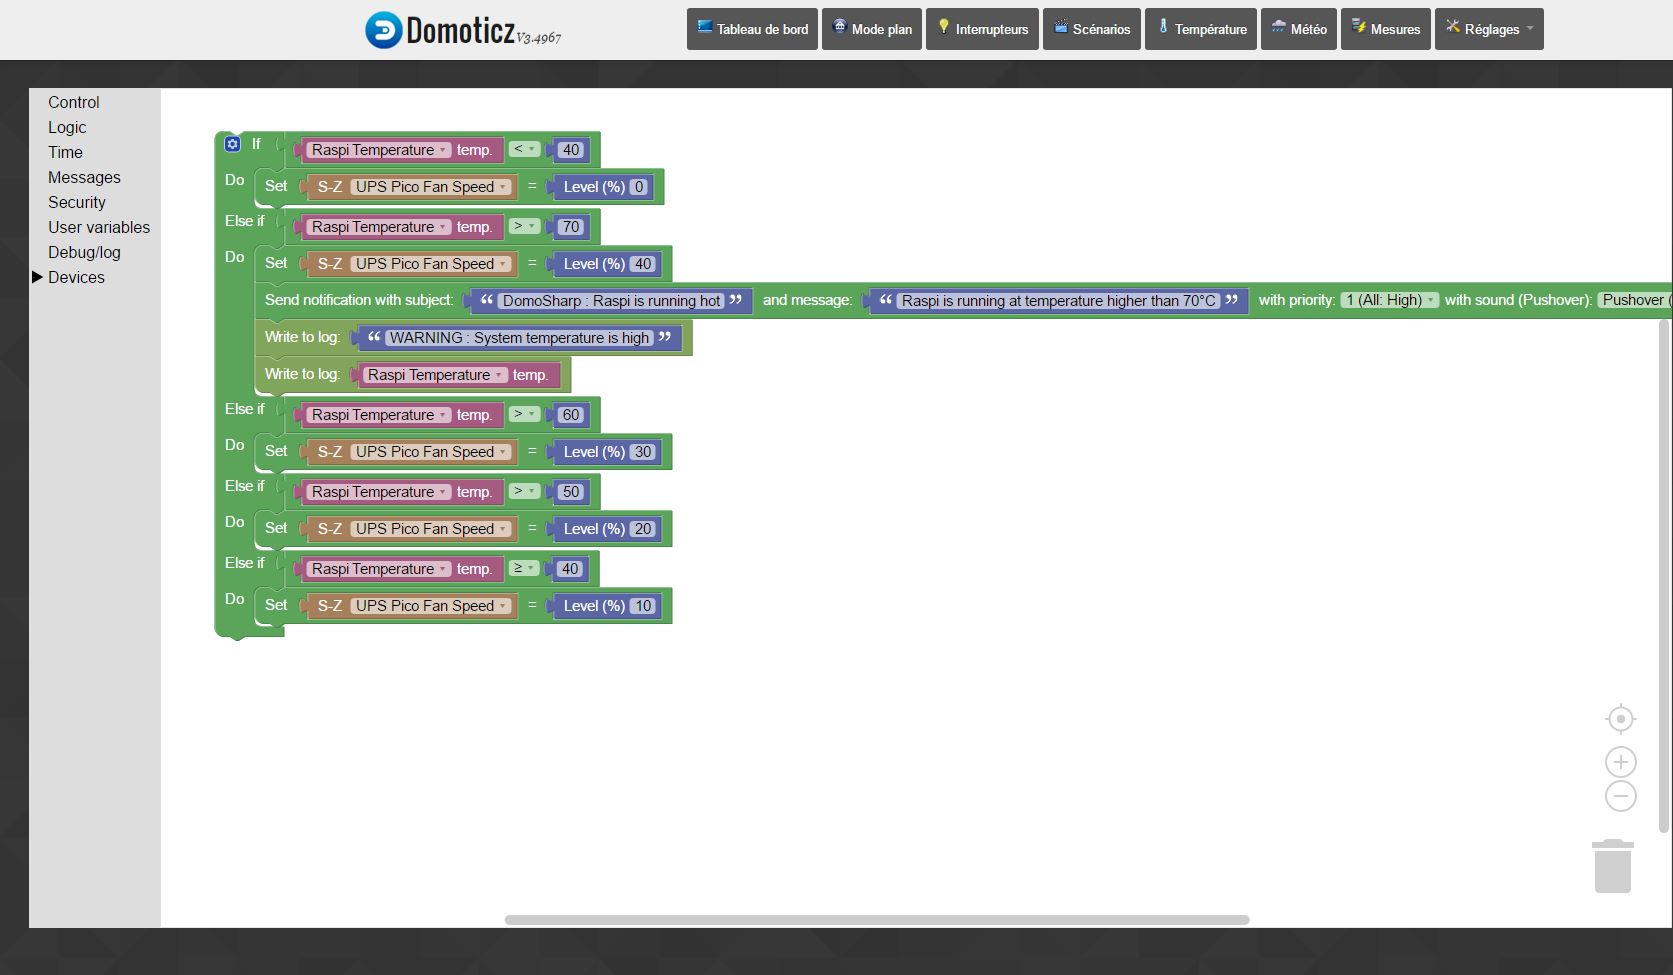
UPS Pico automatic fan control regulated by Blockly
Here under is a screen shot of how I regulate the fan speed using Blockly.
I simply check the temperature of the Raspi CPU and according to the temperature, I set the fan at a higher or lower speed.
This way, Domoticz will automatically select the most appropriate fan speed depending on system conditions.
UPS Pico charger state switch
This switch is used to get the status of the charger on the UPS Pico board
It is only working using UPS Pico firmware equal and above version 5C
It works like so
- If the power supply is sufficient to both activate the battery charge and provide power to the raspberry pi, the charger status in the UPS will be activated
- If the power supply is not sufficient anymore to activate the battery charge and provide power to the raspberry pi, the charger status in the UPS will be deactivated
- If the main power has been lost, the charger is obviously deactivated
Important notice : the status does not reflect if the battery is fully charged or not, neither does it indicate if the battery is actually charging or not. The status is more a reflection of "does the system have a good enough power supply to provide power to UPS and Rasp PI + other optional equipments such as HAT modules, screens, LEDs, etc. So if this switch goes off when the system is connected to the charger, it indicates that the power supply is too weak to power everything. This information could be used to check if a new optional module is drawing too much current for the actual power supply connected to the system, or to monitor if the power supply is going bad.
Bug report
http://www.domoticz.com/forum/viewtopic.php?f=28&t=11068
References
Technical documentation / Ressources
- UPS Pico prospectus : http://pimodules.com/_pdf/UPS_PIco_Prospectus.pdf
- UPS Pico manual : http://pimodules.com/_pdf/UPS_PIco_Manual.pdf
- UPS Pico supporting files (aka software installation kit) : http://pimodules.com/_zip/UPS_PIco_Supporting_Files.zip
- UPS Pico firmware files : http://pimodules.com/_zip/UPS_PIco_Firmware_Update.zip
Useful links
Credits
Thanks to pimodules.com for providing the information and documentation
Author
- Name : JF Hautenauven
- Country : Belgium
- Mail : [email protected]
- Linkedin : https://be.linkedin.com/in/jean-françois-hautenauven-7a308062
