X10 devices, CM15 Pro
Using a CM15Pro X10 Power Line adapter with Domoticz
First of all, make sure your CM15Pro is empty and happy (battery ok etc.) I had some old macros remaining in its memory, which gave very unexpected results. The easiest way to do this is by simply using the original Marmitek/Haibrain Active Home software supplied with the CM15Pro unit.
You can download it here : [1]
Note :
If you are using the CM15Pro and a RFXCom at the same time, make sure that you either disable transceiving (RF -> wired) on the CM15Pro or the X10 protocol on the RFXCom otherwise all X10 RF commands will be received twice : Once from the CM15Pro->Mochad->Domoticz, and another by the RFXCom.
The same goes if you are using an old TM13 device (which transfers X10 RF signals to you powerlines as well). You need it to program X10 switches into domoticz or to setup newer X10 devices, but keep it in mind when everything shows up twice in your Domoticz device list.
I chose to disable X10 RF on the RFXCom device. Mochad will transfer any X10 RF signals received by the CM15Pro to domoticz for you, so you can still use your X10 RF remotes and devices. You are probably better off using the RFXCom if you need to send out X10 RF commands as well.
Mochad TCP <-> CM15Pro gateway software
The mochad software will enable you to use the CM15Pro unit in combination with a linux system. It will run as a daemon on your system and translate between the CM15PRo unit using it's native language and a simple TCP based network connection.
Installing Mochad
Before installing mochad, make sure you system is up-to-date :
 sudo apt-get update
 sudo apt-get upgrade
Mochad needs a usb lib to connect to the CM15Pro, so lets install that first :
sudo apt-get install libusb-1.0-0-dev
Get the latest version of mochad from sourceforge and install it :
 wget -O mochad.tgz http://sourceforge.net/projects/mochad/files/latest/download
 tar xf mochad.tgz

 cd mochad-*
 ./configure
 make
 sudo make install
After installing the mochad software, you can connect the USB CM15Pro adapter in one of the USB ports on the Pi
Wait a few seconds, so the Pi can see the CM15Pro, then test mochad using the CLI.
First startup mochad manualy for now :
sudo ./mochad
Login to the Pi with SSH-2 and make the next test commands to switch 'off' or 'on' a light;
  echo "pl a1 on" | nc localhost 1099
  echo "pl a1 off" | nc localhost 1099
NOTE Hansbit on May 10 2018: There is an issue with Mocad 0.1.17 and Debian Stretch that causes nc to become unresponsive after a first command. The solution is to add a time out parameter (-w1) to you nc command. Example:
  CM15Pro
  echo "pl a1 on" | nc -w1 localhost 1099
  CM19A
  echo "rf a1 on" | nc -w1 localhost 1099
This command will switch a X10 device with addres A1 on and off via the power lines of your home.
Nice huh ? Now lets make sure mochad starts up by itself at boot.
Autostart Mochad at boot
You can make mochad launch automatically at boot by putting it into yout /etc/rc.local file :
sudo nano /etc/rc.local
Insert the following text before 'exit 0' at the end of the file
 # Auto run Mochad
 sudo /home/pi/mochad-0.1.16/mochad &
Save it and exit. Reboot your system and test it again to see if mochad started up correctly.
Note: I found that mochad would not start from my rc.local on my raspberry pi 3 running Raspbian "Jessie", but whenever i entered the same command from the cli by hand it would start up just fine. After a while i simply added a "sleep 20" statement before calling mochad in my rc.local and everything has been working fine ever since. The Raspberry 3 starts up very very fast, so my guess is the CM15Pro device is not ready yet when Mochad is started from rc.local.
 # Auto run Mochad
 sleep 20
 sudo /home/pi/mochad-0.1.16/mochad &
Domoticz & Mochad - Old style
What follows is "the old way" of using mochad with domoticz. It works, but it is probably better, and a lot easier to use the native support for Mochad that is now available in domoticz.
Edit the domoticz script
In the main script folder of the domoticz software you will find the file '_domoticz_main'.
In this file you can write the next lines to test the GUI buttons in Domoticz;
   #!/bin/sh

  startup_path=$1
  hardware_id=$2
  device_id=$3
  status=$4
  status2=$5
  devname=$6

  if [ "$devname" = "Lamp1" ] ; then
         if [ "$status" = "On" ] ; then
                 echo "pl a1 on" | nc localhost 1099
         else
                 echo "pl a1 off" | nc localhost 1099
         fi
  fi

  if [ "$devname" = "Lamp2" ] ; then
         if [ "$status" = "On" ] ; then
                 echo "pl a2 on" | nc localhost 1099
         else
                 echo "pl a2 off" | nc localhost 1099
         fi
  fi

  if [ "$devname" = "Lamp3" ] ; then
         if [ "$status" = "On" ] ; then
                 echo "pl a2 bright 10" | nc localhost 1099
         else
                 echo "pl a2 dim 10" | nc localhost 1099
         fi
  fi
NOTE Hansbit on May 10 2018: There is an issue with Mocad 0.1.17 and Debian Stretch that causes nc to become unresponsive after a first command. The solution is to add a time out parameter (-w1) to you nc command. Example:
echo "pl a1 on" | nc -w1 localhost 1099
Note (assuming your installation is on a Raspberry):
The file 'readme.txt' in '/home/pi/domoticz/scripts' say : 'to use this script, remove the underscore in front of the filename' , so go in the directory and rename the file
 cd /home/pi/domoticz/scripts
 mv _domoticz_main domoticz_main
Make sure the script has executable rights with:
chmod +x domoticz_main
To use this script you need the latest version (minimum Vs. 1.0.940) to make light buttons in the GUI !
The option 'dim' and 'bright' is still in test !!
You can add the 'Dummy' hardware device, and add manual light/switches
Setup X10 devices in web interface
Go to your web page ex : http://your_ip:8080
Go to setup, hardware and add the dummy hardware like this :

Then click the ADD button
Go to swicthes

Manual Light/Switch
![]()
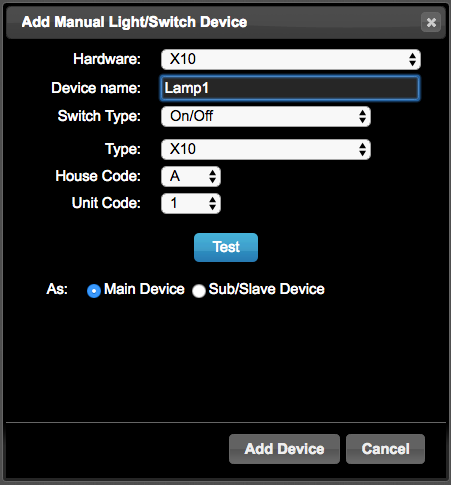
and add a manual light with the information in the script 'domoticz_main'

Go to edit on the new device

and finally specify the path of 'domoticz_main' starting with 'script:///'
script:///home/pi/domoticz/scripts/domoticz_main

Save it and now when you clic on the light icon Domoticz will start the script and do the mochad command ! And ... your light is ON !
Domoticz & Mochad - New style : Native mochad
Domoticz now has native support for mochad. You still need to install mochad as mentioned above, but the communication between mochad and domoticz no longer requires any script work, dummy devices etc.
Create a mochad gateway device
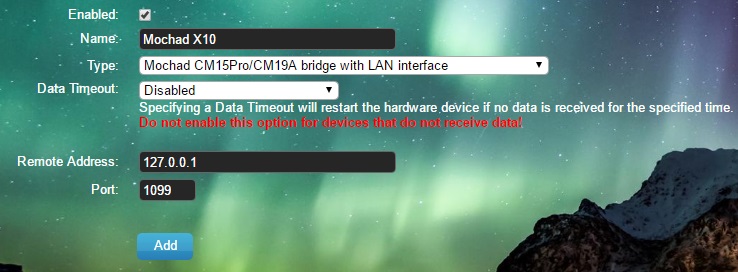
The first step is to add the mochad gateway daemon to domoticz via Setup -> Hardware
Use 127.0.0.1 or localhost if mochad runs on the same system as domoticz. (you can run mochad on another system if you wish)
You can give it any name you like. It will show up as "hardware" name in the device list.
Adding X10 devices
Adding X10 devices is pretty standard from here on end. Just go to the "switches" tab -> Press the "Learn Switch/light button" and then fire off an on or off command for your device on a X10 remote. Domoticz will pick this up and bobs your uncle.
Another way would be to just transmit "on" codes for all devices you need from your X10 remote and pick those up from the device list in domoticz (Setup -> Devices). Just press the green button and off you go.
At this moment you cannot just program a switch manually. I expected that i could just go to Switches -> Manual Light/Switch and just select the mochad gateway as hardware, set the correct house code and unit id and voila. Sadly this does not work, the mochad gateway does not show up in the hardware list there. Learned X10 devices/switches cannot by changed to another X10 address, they simply do not show up if you edit the device.
The only way is to delete them, and recreate them using the correct code.
